Agenda
Introduction
In the previous training, the Purchase manager received items into the warehouse. De facto, the items are already company property but the Purchase manager must anyway post a packing slip to guarantee that the company receives items. The Purchase manager receives a vendor packing slip document via a fax or an e-mail. Then He or She posts a packing slip document.
The following are the results of a packing slip posting:
- Packing slip document is printed
- Receipt type in the inventory transaction is updated from Registered to Received
- General ledger transactions are posted
From Wikipedia:
“Packing slip is a shipping document that accompanies delivery packages, usually inside an attached shipping pouch or inside the package itself. It commonly includes an itemized detail of the package contents and does not include pricing. It serves to inform all parties, including transport agencies, government authorities, and customers, about the contents of the package. It helps them deal with the package accordingly.”
Post the Packing slip
The following procedure helps the Purchase manager post a packing slip:
- Open the Purchase order form (Account payable > Common Forms > Purchase Order Details).
- Find the purchase order created in lesson Create purchase order.
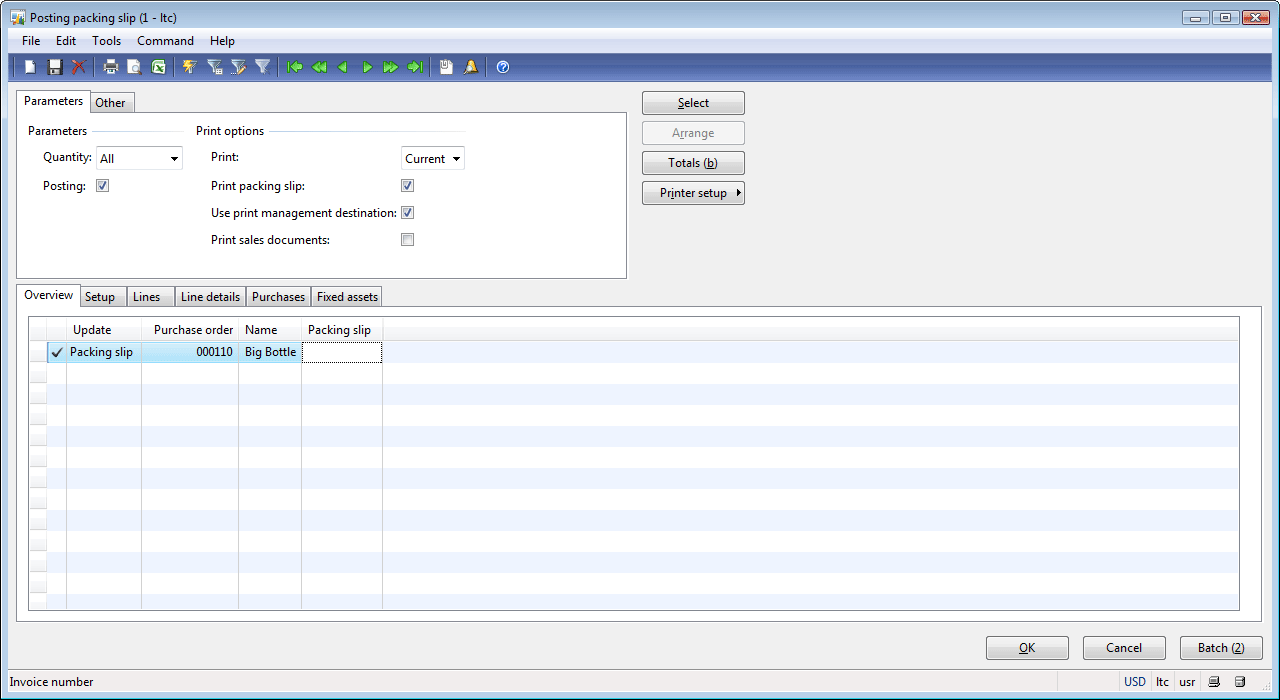
- Click Posting > Packing slip. The Posting packing slip form opens.
This form contains the purchase order that must be packing slip updated. Since all information is set up by default, the Purchase manager can fill in the Packing slip field (number is taken from the vendor packing slip document) and click OK to post the packing slip.
To understand some fields in this form, we will complicate the task for the Purchase manager. Let’s assume that the Purchase manager should print one copy of a packing slip document in another printer and add a “Happy New Year” text to the document’s footer.
- The Purchase manager selects the Print packing slip check box. In this case, a copy of the packing slip will be printed.
- The Purchase manager selects the Use print management destination check box. Doing so enables the print management system.
Print management system
Print management system allows specifying the following options:
- Different printers for different documents (Purchase order, Picking list, Packing slip, or Invoice, etc.)
- Number of copies to be printed
- Footer text
The print management settings are set up in a hierarchy, with each level overriding the one underneath. Level: Module, Vendor, or Purchase order.
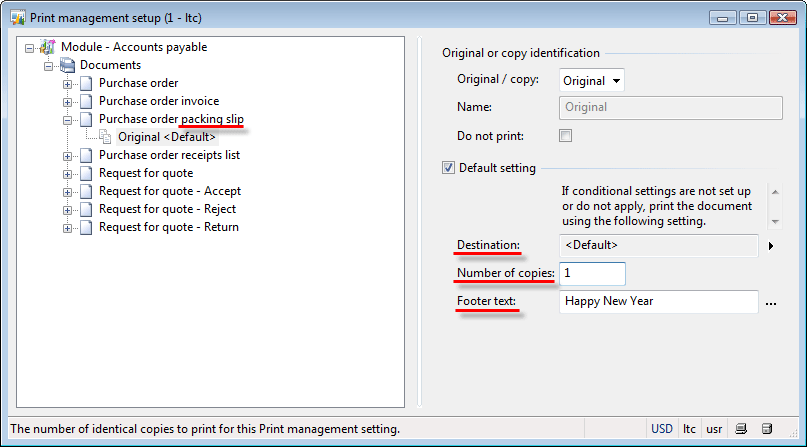
To add the “Happy New Year” text as a footer on each packing slip document, the Purchase manager opens and edits the purchase module print management settings:
- Go to Account payable > Setup > Forms > Form setup > General tab > Print management button.
- In the left pane of the form, select the packing slip document and type “Happy New Year” in the Footer text field.
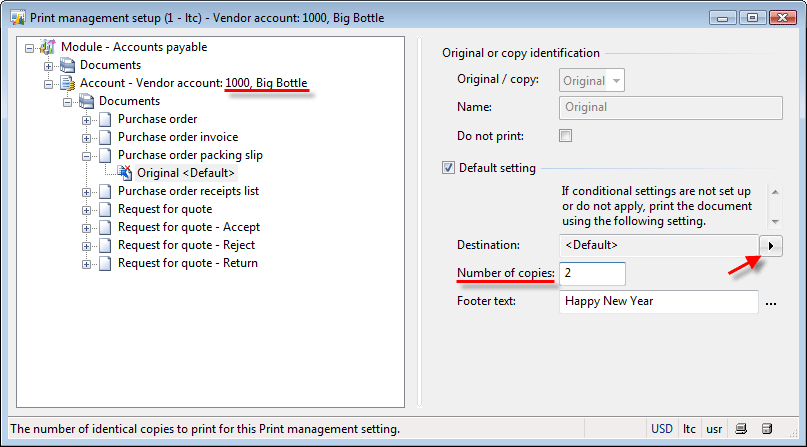
If the Purchase manager wants two copies of a packing slip document to be printed in a specific printer for vendor supplying the Bottle item, he or she opens and edits the vendor print management settings:
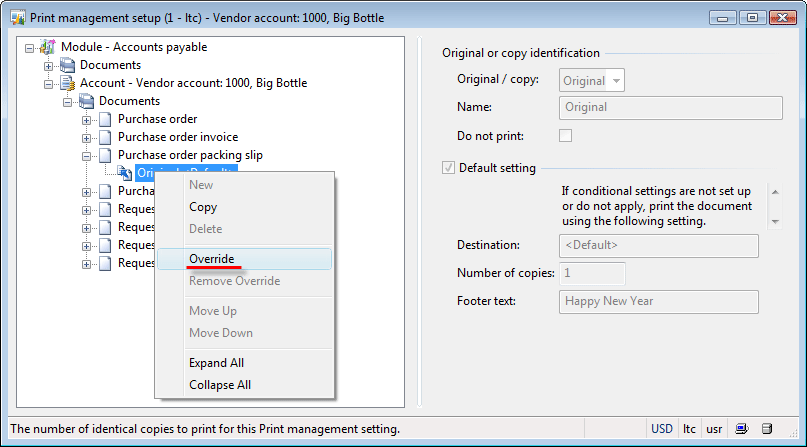
- Go to Accounts payable > Common Forms > Vendor Details > Setup menu button > Print management.
- In the left pane of the form, select the packing slip document. Right-click the Original document node and select Override.
- Type 2 in the Number of copies field.
- Click the “>” button near the Destination field and select another printer (we will leave the one selected).
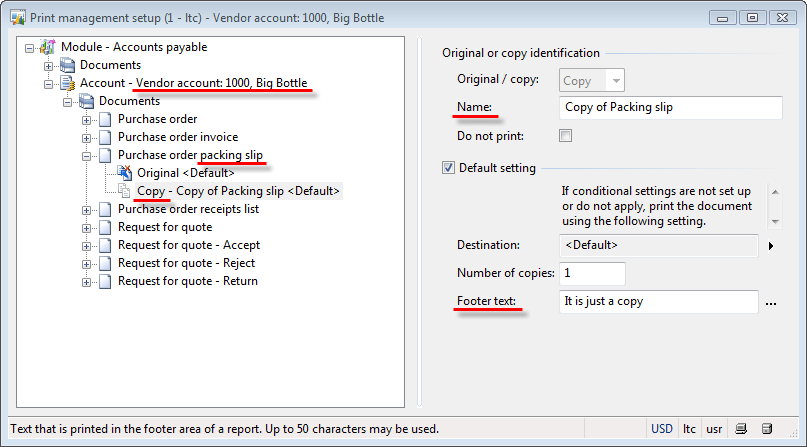
The Purchase manager can add a new document to be printed when a packing slip for this vendor is posted:
- Go to Accounts payable > Common Forms > Vendor Details > Setup menu button > Print management.
- In the left pane of the form, select Packing slip document. Right-click the Purchase order packing slip node and then select New.
- In the right pane, click in the Name field and type Copy of Packing slip.
- Type It is just a copy in the Footer text field.
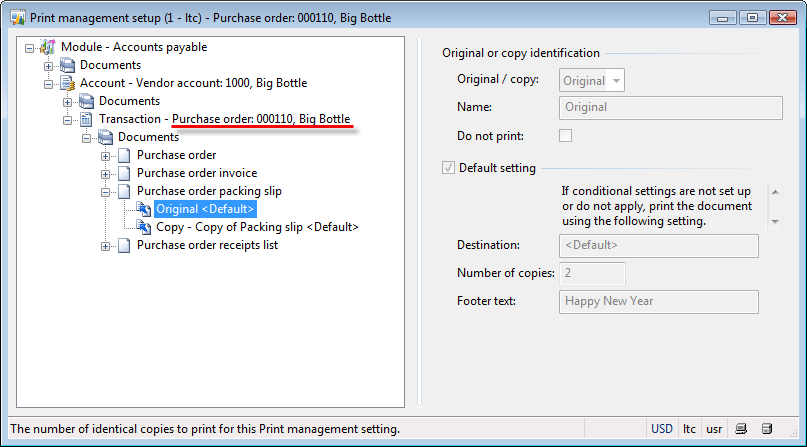
As you understand the Purchase manager can also set up the print management system for a separate Purchase order. She or he can do this in the Print management setup form located under Accounts payable > Common Forms > Purchase Order Details > Setup menu button > Print management.
Now we understand what the Use print management destination check box in the Posting packing slip form is used for. And we will see the “Happy New Year” text in the footer of the packing slip document.
The Purchase manager returns to the Posting packing slip form. The Parameters tab has following setup:
The Purchase manager clicks Ok.
The packing slip and the copy of packing slip documents are shown on the screen.
Posting results
Let’s check the posting results:
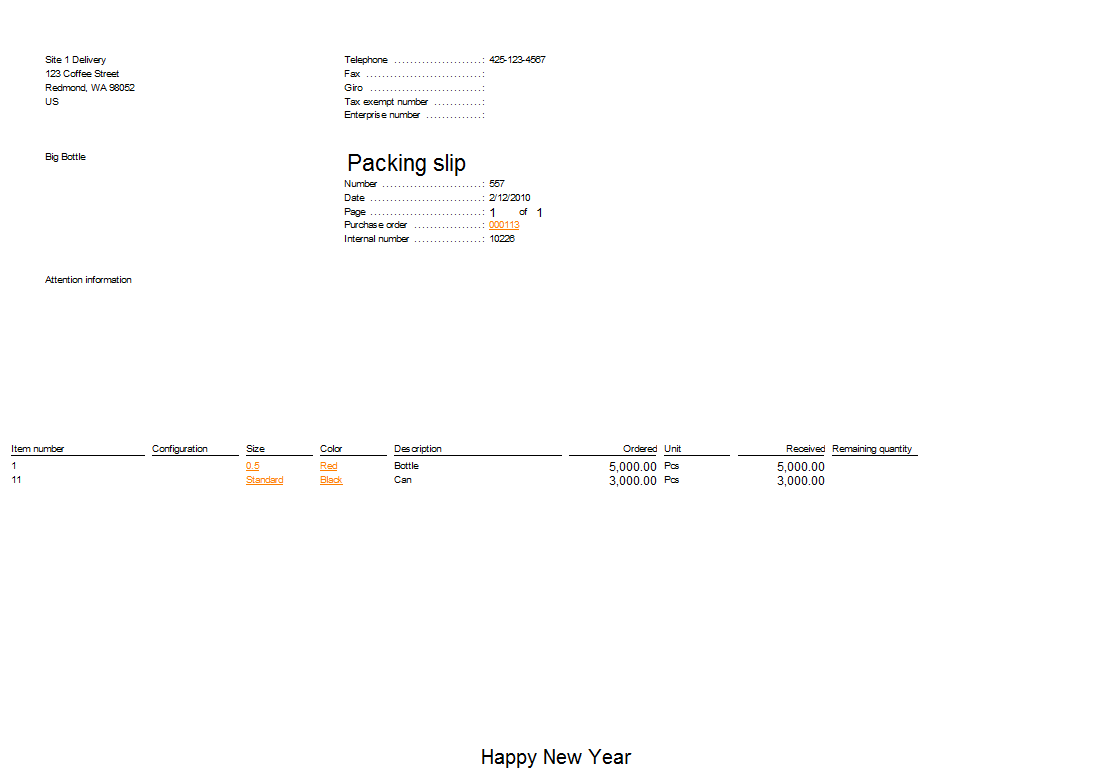
- We can see the “Happy New Year” text in the packing slip footer.
- Two documents are shown: a packing slip and a copy of a packing slip. The copy of the packing slip document contains the “It is just a copy” text in the footer.
- Inventory transaction’s status has changed from Registered to Received:
- Return to the Purchase order form.
- Select the purchase order line with the Bottle item.
- Click Inventory > Transaction
- Find the Receipt field and make sure that the receipt type of the inventory transaction is Received.
- General ledger transactions are created.
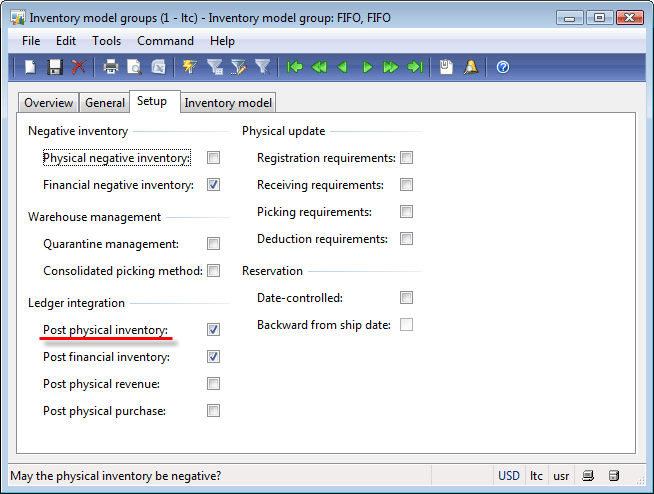
- A company can use general ledger accounts to track amounts of money before an invoice. It is set up in the inventory model group: Inventory management > Setup > Inventory > Inventory model group > Find the FIFO inventory model group (because the Bottle item uses the FIFO inventory model group) > Setup tab > Ledger integration field group > Post physical inventory check box.
- To view general ledger transactions generated from the packing slip, do the following:
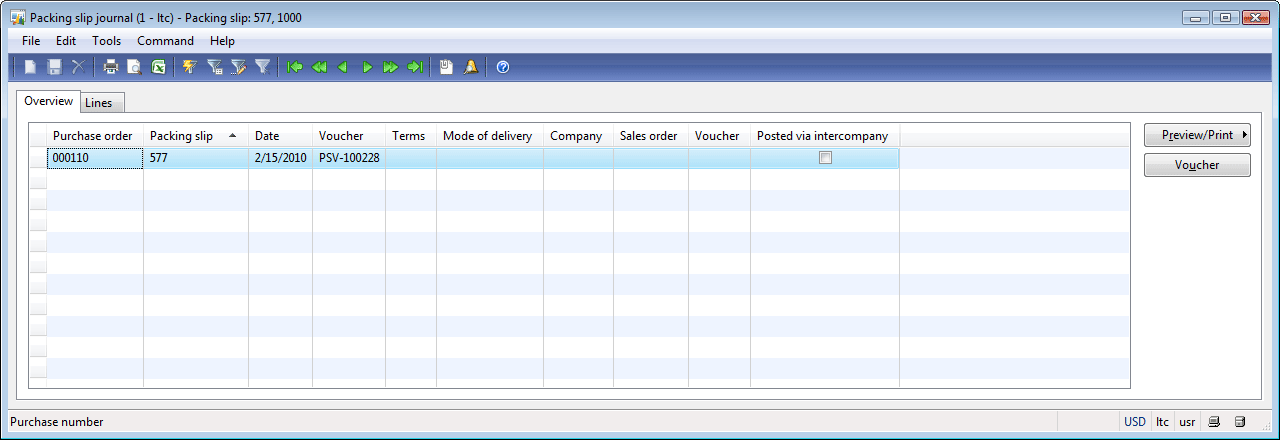
- In the Purchase order form, click Inquiry > Packing slip. The Packing slip journal form opens.
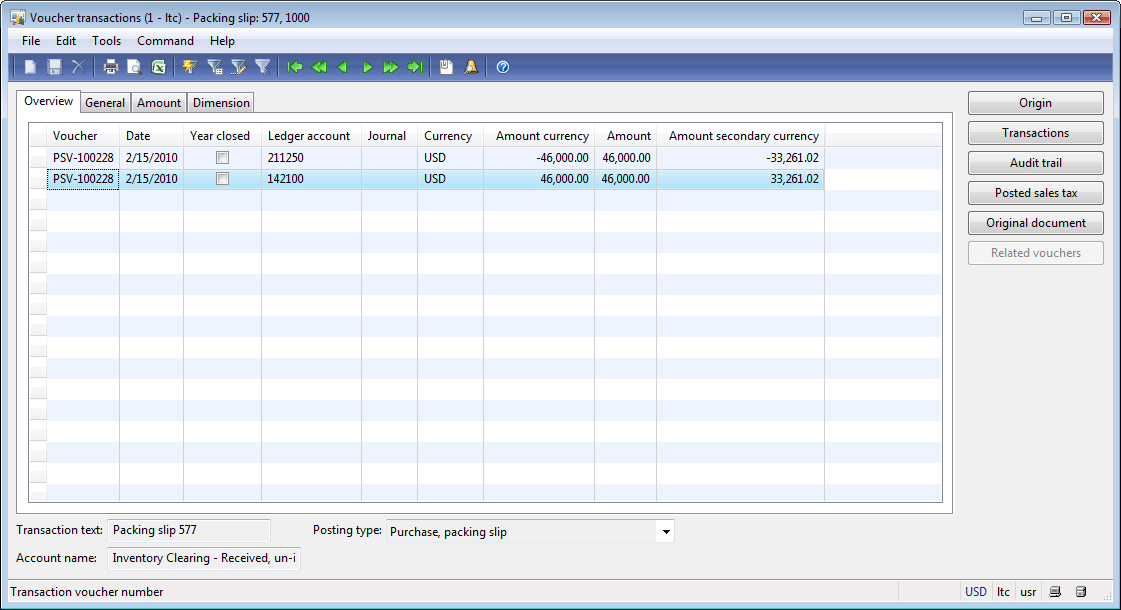
- Click the Voucher button. The Voucher transaction form opens. This form contains the information about general ledger transactions generated from a packing slip.
- 46$ will be added to account 142100 – Inventory, Received, un-invoiced because the purchase order lines net amount is 46$ (the asset account increased with a positive value). The same amount will be added to account 211250 – Account payable (the liability account increases with a negative value). To understand a financial transaction, refer to the Accounting training.
Good work!
Next, I will create a separate article where you can learn what the remaining fields in the Posting packing slip from are used for. The Posting packing slip form description.
In the next training lesson we will post an Invoice.


4 Comments