Agenda
- Introduction
- Creating a Purchase Order
- Confirmation
- Arrival and Registration
- Packing Slip
- Invoice
- Posting Profiles
- Accounting Equation
- General Journal
- General Ledger
- Sub Ledgers
- Invoice Journal
Introduction
In this training lesson, we will purchase some items, analyze financial transactions, and run Financial statements.
The same demo data will be used. Let’s assume that the company decides to purchase 10 items of 1003 (Plasma Television Model 01) from the 1002 (Wind Televisions) vendor.
Creating a Purchase Order
First of all, a purchase order should be created. Open the Purchase order form by navigating to Accounts payable > Common Forms > Purchase Order Details. The Purchase order form opens. (Click the Advanced button to have the advanced form layout.)

Purchase order form
Create a purchase order for the vendor 1002. In the Purchase order form, create a new line. The Create purchase order form opens. Select the vendor 1002 in the Vendor account field. The Transfer vendor information box opens, click Yes.

Create purchase order form
Click OK in the Create purchase order form. The new purchase order will be created.
Create a purchase order line in the purchase order for 10 items. In the Purchase order form in the Lines area, create a new line. Select the item 1003 in the Item number field. Select “HD” in the Configuration field, “42” in the Size field, and “01” (Black) in the Color field. Save the line (Ctrl+S).
The Site, Warehouse, Quantity, Unit, and Unit price fields will be filled in automatically. The default parameters are set up here:
- Site, Quantity, Unit: the Items form (Inventory management > Common Forms > Item details) > find item 1003 > Setup menu button > Default order settings button > Purchase order tab > Purchase Unit, Purchase site, and Min. order quantity fields.
- Warehouse: the Items form (Inventory management > Common Forms > Item details) > find item 1003 > Setup menu button > Site specific order settings button > find Site 2 > Purchase order tab > Purchase warehouse field.
- Price: Items form (Inventory management > Common Forms > Item details) > find item 1003 > Setup menu button > Item dimension combinations button > find HD + 42 + 01 combination > Price button > find 2 Site > Price field.
The Purchase order form will look as follows:

Purchase order form
The purchase process consists of the following steps:
- Confirmation
- Arrival
- Registration
- Packing slip
- Invoice
We will go through these steps with the attention to the financial results. To know more about the purchase process, read this training lesson.
Confirmation
The Purchase Manager agrees with the vendor all purchase details and confirms them. To record in the system that the purchase order is confirmed, the confirmation step is used. This step does not generate transactions, because it does not influence the company’s assets or liabilities.
The Purchase Manager opens the Purchase order form and clicks the Posting > Purchase order button. The Posting purchase order form opens. Click OK.

Posting purchase order form
In the Purchase order form, click Inquiries > Purchase order to review the posting results. The Purchase order journal form opens.

Purchase order journal form
The form contains the result of confirmation operation. We can see that the purchase journal “000167-1” is created with one line and is posted. This operation has no influence on accounts. The Purchase order journal form doesn’t have the Voucher button. A voucher is used to group all transactions generated for one operation. Since the Purchase order journal form doesn’t have the Voucher button, the confirmation operation never generates transactions.
Arrival and Registration
Arrival and registration steps are used when the Warehouse management is enabled for the item. This step is used to track items that arrived into the warehouse and the places where the items were stored in the warehouse. This process is described in more detail in the Item arrival and registration lesson from the Trade and Logistics training.
The Warehouse management consists of the item arrival and registration steps during purchase and the picking and shipping steps during sales. The item 1003 doesn’t use the Warehouse management, because it doesn’t have the location and pallet dimensions (see the item Dimension group) and the Registration and Picking steps are not mandatory (see the item Inventory model group). Both groups are set up in the Items form.
This step is used to record that items arrived. Note that the item is not the company’s property yet. Since the item is not the company’s property, the operation does not influence the company’s assets or liabilities. Transactions are not generated.
To record that the items arrived and are registered, do the following (for the items that do not use the Warehouse management only). In the Purchase order form, click the Posting > Receipt list button. The Posting receipt list form opens. On the Lines tab, you can make sure that all items will be registered. Click OK.

Posting receipt list form
To review the posting results in the Purchase order form, click the Inquiries > Receipts list button. The Receipts list journal form opens.

Receipts list journal form
We can see that the receipt list journal is created. But the Receipts list journal form also doesn’t have the Voucher button, because this operation never generates transactions.
Packing Slip
The packing slip step is used to record that the items are delivered and become the company’s property. Since the items become the company’s property, the company assets and liabilities change, because the company’s inventory is increased. This operation generates transactions.
The inventory increases and the vendor liabilities also increase. Inventory is the company’s asset, so when the asset account is increased, the debit part is used (Debit is “good” for the company). The Vendor or Accounts payable are the company liabilities; when liabilities increase, the credit part is used (Credit is “bad” for the company). In the previous training lesson, we analyzed the same transaction when purchasing the pizza ingredients. The transaction will look as follows:
| Inventory | Accounts payable | ||
| Debit | Credit | Debit | Credit |
| $30 750 | $30 750 | ||
Let’s post the packing slip in Microsoft Dynamics AX and check the results. In the Purchase order form, click the Posting > Packing slip button. The Posting packing slip form opens. Enter any value in the Packing slip field, for example “Packing slip 1” and click OK.

Posting packing slip form
The “Period 2/11/2012 is not open” error message appears. It is because Microsoft Dynamics AX is trying to generate transactions but cannot find an open fiscal period for the current date. We must set up periods for the current year:
- Go to General ledgers > Setup > Periods > Periods. The Periods form opens.
- Click the Create fiscal year button. The Create new fiscal year form opens. Fill in 1 in the Desired length of period field and Month in the Unit field. Click OK.

Create new fiscal year form
The Periods form will look as follows:

Periods form
Post the packing slip again. Don’t forget to select the “Packing slip 1” value in the Packing slip field. The packing slip is posted successfully.
Note that the purchase order status changed from Open order to Received. To review the posting results in the Purchase order form click the Inquiries > Packing slip button. The Packing slip journal form opens.

Packing slip journal form
We can see that the packing slip journal is generated. The Packing slip journal form contains the Voucher button. To view the transactions that are generated for this step click the Voucher button. The voucher contains all transactions that were generated for one posting. The Voucher transactions form opens.
")
Voucher transactions form (Packing slip)
The form contains two lines – one line for each account. The following accounts were used:
| 142100 | 211250 | ||
| Debit | Credit | Debit | Credit |
| $30 750 | $30 750 | ||
This transaction is similar to the one that we have assumed. Let’s find the information about these accounts.
All accounts are listed in the Chart of accounts. Go to General ledger > Common Forms > Chart of Account Details. The Chart of accounts form opens. Find the 142100 account.

Chart of accounts form
We can see that the account 142100 is called “Inventory Clearing – Received, un-invoiced”. The header account for this account is 140000 (INVENTORY). So, this account is one of the Inventory accounts that is used to store the money equivalent of items that were delivered but not invoiced.
Find the account 211250 in the Chart of accounts form. We can see that the account 211250 is called “Accounts Payable – Clearing”. The header account for this account is 211000 (ACCOUNTS PAYABLE). So, this account is one of the Accounts Payable accounts that is used to store the un-invoiced liability.
So, we make sure that Microsoft Dynamics AX generates the same transaction as we have assumed.
Invoice
The final and the main step in the purchase process is the Invoice. This step is used to record that the company agrees to pay for the delivered items. Until the invoice step is performed, the company could not pay for the delivered items. The vendor sends the Invoice document with the amount to pay. If the Company agrees to pay this amount for the delivered items, the Invoice is registered (in other words is posted) in the system.
This process changes the financial situation in the company, because the packing slip transaction should be reversed and a transaction with the inventory and accounts payable accounts must be generated.
The transactions will look as follows:
| Inventory un-invoiced | Accounts payable – Clearing | Reverse the amount from packing slip step | ||
| Debit | Credit | Debit | Credit | |
| $30 750 | $30 750 | |||
| Inventory | Accounts payable | |||
| Debit | Credit | Debit | Credit | |
| $30 750 | $30 750 | |||
The first transaction reverses the amount on the accounts that were used in the packing slip step. After this the inventory uninvoiced total amount will be zero (Debit – Credit):
| Inventory uninvoiced | ||
| Debit | Credit | |
| $30 750 | Packing slip transaction | |
| $30 750 | Reverse transaction | |
The Accounts payable – Clearing account will also have the zero amount. This means that the company doesn’t have the un-invoiced inventory and the accounts payable that are not yet approved.
Let’s post the invoice in Microsoft Dynamics AX and check the results. In the Purchase order form, click the Posting > Invoice button. The Posting Invoice form opens. Enter any value in the Invoice field, for example “Invoice 1”, and click OK.

Posting Invoice form
Note that the purchase order status changes from Received to Invoiced. To review the posting results in the Purchase order form, click the Inquiries > Invoice button. The Invoice journal form opens.

Invoice journal form
We can see that the invoice journal is generated. The Invoice journal form contains the Voucher button. To view the transactions that are generated for this step, click the Voucher button. The voucher contains all transactions that were generated for one posting. The Voucher transactions form opens.

Voucher transactions form
The form contains four lines – one line for each account. The following accounts were used:
| 142100 | 211250 | ||
| Debit | Credit | Debit | Credit |
| $30 750 | $30 750 | ||
| 140820 | 211100 | ||
| Debit | Credit | Debit | Credit |
| $30 750 | $30 750 | ||
The first transaction reverses the amount on the 142100 (Inventory clearing – received, un-invoiced) and 2110250 (Accounts Payable – Clearing) accounts.
Let’s find information about the accounts from the second transaction. Open the Chart of accounts form by navigating to General ledger > Common Forms > Chart of Accounts Details. Find the account 140820. The account is called “Television receipts”. The header account is 140000 (INVENTORY). So 140820 is one of the Inventory accounts. This account is used to store the money equivalent of the television items that the company has.
Find the account 211100 in the Chart of accounts form. The account is called “Accounts payable – US”. The header account is 211000 (ACCOUNTS PAYABLE). So, 211100 is one of the Accounts payable accounts. We make sure that Microsoft Dynamics AX generates the same transactions as we have assumed.
Let’s check what transactions are recorded to the 142100 (Inventory un-invoiced) account and the account balance.
Open the Chart of accounts form and find the 142100 account. Click the Transactions button, the Account transactions form opens.

Account transactions form
Our demo data already has a lot of transactions on this account. But, according to the date, only two transactions were generated for this account during the purchase process. Both transactions have different voucher numbers, so they were initiated from different operations. To view all transactions associated with the voucher number, click the Voucher button. The Voucher number form opens. On the General tab, in the Document field we can find the document number for which the transaction was generated. The first transaction was generated for the packing slip operation, and the second for the invoice operation.
The total amount (or the account balance) is the sum of all transaction amounts. To view the account balance, click the Balance > Balance button in the Chart of accounts form. The Balance form opens.

Balance form
We can see that the account has some balance. But, if we sum the transactions from the packing slip and the invoice operations, the sum will be zero.
Note that the account transactions could not be created for the Packing slip step, because it is an optional step. The company employees record the information to the accounts during the packing slip step if they want to track the un-invoiced items.
The Inventory model group is used to enable or disable the creation of account transactions during the packing slip step. Let’s check the inventory model group of the item 1003. Go to Inventory management > Common Forms > Item details > find 1003 item > General tab > Groups field group > Inventory model group field. The 1003 item uses the “Std Cost” inventory model group.

Item form, General tab
Let’s find out what setup this group has. Go to Inventory management > Setup > Inventory > Inventory model groups > find the “Std Cost” group > Setup tab.

Inventory model groups form
The Ledger integration field group contains the settings which will allow generating transactions during the packing slip step (the Post physical inventory check box), or even during the invoice step (the Post financial inventory check box).
We make sure that for the 1003 item, the transaction is generated during the packing slip step. But, during the invoice step this transaction is reversed and a new transaction for the correct accounts is created.
Posting Profiles
How does Microsoft Dynamics AX know what accounts should be used instead of the Inventory and Accounts Receivable accounts in different operations? For example, why does Microsoft Dynamics AX use the 211100 account as the Accounts Payable during the Invoice posting, and the 211250 account as the Accounts Payable un-invoiced during the Packing slip posting?
All information about accounts is stored in posting profiles. Microsoft Dynamics AX has a customer, vendor, and inventory posting profiles.
The vendor posting profile answers the question what account should be used for a specific vendor. Let’s find the vendor posting profile that is used in our demo data. Go to Accounts payable > Setup > Parameters. The Accounts payable parameters form opens. Go to the Ledger and sales tax tab, the Posting field group has the Posting profile field. In our case, the vendor posting profile is “GEN”.

Accounts payable parameters form
Let’s check what setup the “GEN” vendor posting profile has. We hope to find the 211100 and 211250 accounts because they are used in our transactions instead of the Accounts Payable accounts. Go to Accounts payable > Setup > Posting profiles. The Vendor posting profile form opens. Select the “GEN” posting profile and go to the Setup tab.

Vendor posting profile form
We can see that there are two kinds of setup – one for the vendor that belongs to the “90” (Intercompany vendors) vendor group and the other for all vendors. We should find out to what vendor group the 1002 vendor belongs. Go to Accounts payable > Common Forms > Vendor Details. The Vendors form opens.

Vendors form
We can see that the 1002 vendor belongs to the 10 (Video vendors) group. Since the “GEN” profile doesn’t have an individual setup for the “10” vendor group, the setup for all vendors is used.
Return to the Vendor posting profile form. On the Setup tab, we can see that for all vendors (except the intercompany vendors), the 211100 account should be used as Accounts Payable. We make sure that during the invoice posting, the 211100 account was used as Accounts Payable. We can see that the setup doesn’t have the 211250 account. This account is used in the Packing slip step as the Accounts Payable un-invoiced (in the Invoice step, it is only reversed, i.e. the account is taken from the Packing slip step). The Microsoft Dynamics AX architects decided to place the setup for the Accounts Payable un-invoiced in the inventory posting profile.
Let’s look at the inventory posting profile. We hope to find the 142100 and 140820 accounts because they are used as the Inventory un-invoiced and Inventory accounts. And, also the 211250 account because it is used as the Accounts payable un-invoiced account.
Go to Inventory management > Setup > Posting > Posting. The Inventory posting form opens, go to the Purchase order tab.

Inventory posting form
During the packing slip step, the accounts from the Packing slip and Packing slip offset setup are used. During the Invoice step, the accounts from the Receipt setup are used.
The Packing slip setup is used for the Inventory un-invoiced accounts. The Packing slip offset setup is used for the Accounts payable un-invoiced accounts. The Receipt setup is used for the Inventory accounts.
Select the Packing slip radio button. There are two setup lines – one for the “Ind Exp” (Indirect purchase expense) items, another for the rest of items. Let’s find out the item group that the 1003 item belongs to. Go to Inventory management > Common Forms > Item details. The Item form opens, find the 1003 item and go to the General tab. On the General tab, find the Item group field. The 1003 item belongs to the “Television” group.

Item form, General tab
Return to the Inventory posting form. Since there is no individual setup for the “Television” item group, the setup for all items will be used. Since the Packing slip option is used for inventory un-invoiced accounts, we make sure that for the 1003 item, the 142100 account is used as the Inventory un-invoiced account.
Select the Packing slip offset radio button. The grid contains the setup for the Accounts payable un-invoiced accounts. We can see that for the 1003 item, the 211250 account is used as the Accounts payable un-invoiced account.

Inventory posting form
Select the Receipt radio button. The setup for the Inventory accounts becomes available. Find the setup for the “Television” items. Make sure that for the 1003 item, the 140820 account is used as the Inventory account.
Besides the customer, vendor, and inventory posting profiles, Microsoft Dynamics AX has the setup for the system accounts and sales taxes:
- System accounts setup is available under General ledger > Setup > Posting > System accounts.

System accounts form
- Accounts setup for sales tax posting is available under General ledger > Setup > Sales tax > Ledger posting groups.

Ledger posting groups form
Accounting Equation
After we have purchased the 1003 item, the Assets and the Accounts payable increased. Let’s run the Balance sheet report and check the accounting equation: Asset = Liabilities + Owner’s Equity.
Go to General ledger > Reports > Transactions > Periodic > Financial statement. The Financial statement form opens. Select BS (Balance sheet) in the Financial statement field and click OK.

Balance sheet

Balance sheet
We can see that for the current year the total Asset is $30 750 and the total Liabilities is $30 750. So, the accounting equation is correct: $30 750 (Asset) = $30 750(Liabilities) + 0 (Owner’s equity).
We can also check whether the company is profitable, but we don’t sell any items. In this case, the company’s profit equals zero. To check whether the company is profitable, we will run the Income statement report. Profit is the difference between the Income and the Expenses.
Go to General ledger > Reports > Transactions > Periodic > Financial statement. The Financial statement form opens. Select IS (Income statement) in the Financial statement field and click OK.

Income statement

Income statement
We can see that the income and the expenses for the current period equal zero.
General Journal
Remember in the previous training lesson we have studied the Accounting cycle. The accounting cycle shows the steps of the accountant work. With the help of the purchase order and the posting profiles, some steps are performed automatically to simplify the accountant’s work.
But, all processes that influence the financial situation of the company can be recorded with the help of the General journal. The General journal is the most basic of journals. Since Microsoft Dynamics AX has the Purchase order, Sales order, Production order, and other forms, the general journal is almost not used. But, not all operations are handled with the help of special forms, among these are bad debts, sale of an asset, etc. To record these operations, the general journal is used.
Let’s record the purchase operation with the help of the general journal and go through the accounting cycle steps (open the accounting cycle paragraph from the first lesson to recall).
- Some operation occurs. In our case the first step is when the Purchase Manager initiates purchasing the items and signs the Invoice document for $30 750.
- Then the Purchase Manager brings the Invoice document to the accounting department.
- The accounting personnel analyze the business papers. It is necessary to determine the following:
- “What happened?” Answer – The company buys items.
- “What accounts will change?” Answer – Inventory (Asset ) and Accounts payable (Liabilities). The accountant decides to use the 140820 account as the television receipts and the 211100 account as the accounts payable.
- “How will they change?” – Answer – Inventory increases and the Accounts payable increase as well.
- “Do they get a Debit or Credit?” – Answer – If the assets increase, the debit part is used, if the liabilities increase, the credit part is used. Debit is “good” for the company, Credit is “bad” for the company.
- The Accountant writes the following transactions to the general journal:
140820 (Inventory) 211100 (Accounts payable) Debit Credit Debit Credit $30 750 $30 750
To create a new journal, take the following steps:
- Go to General ledger > Journals > General journal. The Journal form opens. Create a new journal by clicking Ctrl +N.
- Select “GenJrn” in the Name field.

Journal form
- Click the Lines button. The Journal voucher form opens.
- Create a new line. Select the 140820 (Television receipts) account in the Accountfield. The “Ledger account 140820 is locked” message appears. Each account has the setup that enables or disables posting with the help of a general journal. Enable journal posting for both accounts:
- Go to General ledger > Common Forms > Chart of Account Details > Find the 140820 account > Clear the Locked in journal check box. Perform the same steps for the 211100 account.
- Return to the Journal voucher form. Select 140820 in the Account field.
- Fill in $30 750 in the Debit field. Save the line.
- Crete a new line. Select 211100 in the Account field.
- Fill in $30 750 in the Creditfield. Save the line.

Journal voucher form
- Note that for each operation the Debit part should be equal to the Credit part.
- Click the Validate > Validate button. The “Journal is Ok” message appears.
- It is also possible to record the same transactions in one line with the help of the offset account. The amount will be recorded to the offset account in the differ part. For example, if the amount is recorded to the credit part for the account, then for the offset account, the amount will be recorded to the debit part. In other words, we can write the same transactions in the following way:

Journal voucher form
The journal is also valid.
- Posting a journal is the act of transferring the journal information (i.e. the amount) to the appropriate accounts. To do this, click the Post > Post button. The “Number of vouchers posted to the journal: 1” message appears. It means that the journal is posted successfully.
- The accountant checks the posting results with the help of the Trial balance. A Trial balance is process of checking the accounting equation: Assets = Liabilities + Owner’s Equity. For this purpose, the list of accounts and their balances is required. We can check all balances in the Chart of accounts form. Or, we can run the Balance sheet statement. In the previous paragraph, we have already checked the Trial balance with the help of the Balance sheet.
All the other steps are performed at the end of the period or the fiscal year and will be discussed later in this training.
General Ledger
You may ask why the General ledger name is given to the module in Microsoft Dynamics AX. The General ledger consists of the chart of accounts and account transactions. Let’s understand what the difference between the Chart of accounts, General journal, and General ledger is. How did the Accountant record operations in the past when there were no computers? According to the accounting cycle, the Accountant receives a document and then analyzes what account should be used for this operation from the Chart of accounts. Then, he records the transactions in the General journal. Then, the Accountant “posts” the transactions by adding the amounts to the debit or credit parts of the account in the General ledger. So, the Accountant uses four documents: an operation document, the Chart of Accounts, the General journal, and the General ledger. The chart of accounts is a list of accounts, the General journal is used to record transactions, the General ledger contains the results of posting.
The balance sheet and the income statement are built on basis of the general ledger. The general ledger is built up by posting transactions recorded in the general journal, purchase order, sales order, production order, etc. The general ledger should include the date, description, and the balance or the total amount for each account. It is usually divided into at least seven main categories. These categories generally include the assets, liabilities, owner’s equity, revenue, expenses, gains, and losses. The general ledger should always be in balance, thus maintaining the accounting equation: Assets = Liabilities + Owner’s Equity.
In Microsoft Dynamics AX, the General ledger is the Chart of accounts plus the Account transaction forms or, in other words, or the place where all information about the accounts and their transactions is stored.
Note that the account transactions are often called general ledger transactions, and the accounts are usually called general ledger accounts.
Sub Ledgers
We have purchased 50 items in whole. The fist purchase of 25 items was recorded with the help of the purchase order, the second purchase was recorded with the help of the general journal. What have we missed when recording the purchase with the help of the general journal? We haven’t entered the information about the vendor and the item.
If we look at the account and its transactions, we can’t answer the question what item and from whom was purchased. For example, we can only find that the account 211100 has $30 750 in the credit part, which means that the company owes $30 750 to some vendor. The ledger transactions don’t have the information about the vendor, so it is impossible to find out from who the items were purchased.
To record the information about the vendor, the special vendor ledger is used. Instead of accounts, this ledger contains the vendor accounts. The vendor ledger contains a separate account for each vendor and tracks vendor balances separately. When the company purchases items from the vendor, a vendor transaction is created. This transaction contains the vendor information and the amount to be paid. The vendor accounts can then be summed and compared with their controlling account to ensure the accuracy as part of the process of preparing a trial balance. In our case, all vendor accounts, except Intercompany vendors (see the vendor posting profile), have the 211100 controlling account.
The “chart of accounts” for the Vendor ledger is a list of vendors. Let’s find the 1002 vendor and check the transactions for it. The Vendor form is located under Accounts payable > Common Forms > Vendor details. Find the 1002 vendor and click the Transactions button. The Vendor transactions form opens.

Vendor transactions form
We can see that the vendor has only one vendor transaction. This transaction was generated when we purchases items with the help of the Purchase order form. The “Invoice 1” document number was used when we posted the Invoice with the help of the Purchase order form. To verify this, click the Original document > Show button > the Purchase order field.
When we click the Voucher button in the Vendor transactions form, we can see the general ledger transactions.

Voucher transactions form
When we click the Origin button in the Voucher transactions form, we can see all transactions for all ledgers that were generated during the invoice posting. Among them, we can find the general ledger, vendor, and item transactions. Note that all transactions are grouped in one voucher with the INV-100135 number.

Transaction origin form
By analogy with the Vendor ledger, the Inventory ledger is used to record the item transactions. This information is used to find out what items were purchased. The Inventory ledger contains a separate account for each item. When the company purchases items, an item transaction is created. This transaction contains the item name and the item cost. The item accounts can then be summed and compared with their controlling account to ensure the accuracy as part of the process of preparing a trial balance. The controlling account is set up in the Inventory posting form located under Inventory management > Setup > Posting > Posting. In our case, the 1003 item has the 140820 controlling account.
The “chart of accounts” for the Item ledger is a list of items located under Inventory management > Common Forms > Item details. Find the 1003 (Plasma Television Model 01) item and click the Transactions button.

Transactions on item form
We can see that only one purchase transaction for 25 items exists. If we click the Ledger > Financial voucher button, the Voucher transactions form opens. We can see all ledger transactions that were generated.

Voucher transactions form
Note that these are the same general ledger transactions that we have seen when opening the Voucher transactions form from the Vendor transactions form.
If we click the Origin button, the Transaction origin form opens.

Transaction origin form
This form contains the information about all transactions for all ledgers that were generated. Note that they have the same INV-100135 voucher number, so these are the same transactions, but opened from a different location.
Note that the Transaction origin form shows the transactions for all ledgers (general ledger, vendor ledger, inventory ledger). All ledgers, except general ledger, are called Sub-ledgers or subsidiary ledgers.
Remember we have studied that all company operations can be recorded with the help of the general journal. This is not totally true. In the previous paragraph, we have posted a purchase operation without two the transactions – vendor and item transactions. Let’s create a new general journal and try to post the following transaction:
| 1003 (Item) | 1002 (Vendor) | ||
| Debit | Credit | Debit | Credit |
| $30 750 | $30 750 |
- Go to General ledger > Journals > General journal. The Journal form opens.
- Crete a new line. Select “GenJrn” in the Name field.
- Click the Lines button. The Journal voucher form opens.
- In the Account type field, select “Inventory”. But, there is no Inventory type.
- Fill in $30 750 in the Debit field.
- In the Offset account type field, select “Vendor”. In the Account field, select 1002.

Journal voucher form
If we check the voucher (click the Validate > Validate button), the “Account number must be specified” message appears. So, it is impossible to record the Inventory transactions with the help of the general journal. What about the Vendor transaction? If we select Vendor in the Account type field and 1002 in the Account field, move the amount from the Debit to Credit field, remove the offset account and validate the journal. The “The transactions on voucher GEN00000008 do not balance” message appears. The voucher should be balanced, i.e. Debit part = Credit part. Since we can’t select the inventory account, we can’t post the vendor transaction.
I try to add the insufficient vendor and inventory transactions with the help of other journals – Invoice and Movement journals.
The Invoice journal is located under Accounts payable > Journals > Invoices > Invoice journal. This is the same general ledger journal, so it is impossible to select the Inventory account type.
The Movement journal is located under Inventory management > Journals > Item transaction > Movement. In this journal, we can select the item but can’t select the vendor account type (only the ledger account type).
So, to post all purchase transactions correctly to all ledgers in Microsoft Dynamics AX, the Purchase order form is used. With the help of the general ledger, you couldn’t post the item transaction.
Now, the following situation happens in the company. All Vendors balance (except the intercompany vendors) is $30 750, but the 211100 control account (Accounts payable) balance for the current year is $61 500. And, we can’t enter the vendor transaction to correct this situation. To prevent this situation, the Locked in journal check box is used for all controlling accounts (in the Chart of accounts form). Because of this, the 211100 and 140820 accounts were blocked to be used in the journal.
The purchase operation is posted with the help of the Purchase order form, the sales operation – with the Sales order form, the production operation – with the Production orders form. With the help of the General journal, we can post all operations that do not include the Item transactions: payments, bad debts, sale of an asset.
Invoice Journal
Imagine the following situation – the vendor sends us an Invoice for some service. We should record this information to the general and vendor ledgers. But, we don’t have the item number for this service. In this case, we can’t use the Purchase order form. You can answer that we can use the general journal, because this operation does not generate an inventory transaction. And, you will be right. The general journal can be used to post the Invoice from the vendor if an item transaction is not required. But, for convenience in Microsoft Dynamics AX, the Invoice journal is available. The Invoice journal is used for posting vendor invoices when the purchased items or services are not recorded to the Inventory ledger.
We assume that the vendor sends us an Invoice for $20 for some service. The Accountant analyzes the received Invoice and enters the following transaction for this operation:
| Accounts payable | Service Expense | ||
| Debit | Credit | Debit | Credit |
| $20 | $20 | ||
Accounts payable is the Liabilities account, the amount on this account increases, so the Credit part is used (Credit is “bad” for the company). The Expense is also the Liabilities and the amount is also increased but the Debit part is used. It is because the increase of the Expense is “good” for the company. In this case, the net income decreases, as we know that the net income is the company’s liability and should be returned to the Owners.
We should record this information in the Invoice journal, post the Invoice, and analyze the results.
- Open the Journal form by clicking Accounts payable > Journals > Invoices > Invoice journal. The Journal form opens.
- Create a new line. Select “APInv” in the Name field.
- Click the Lines button. The Journal voucher form opens.
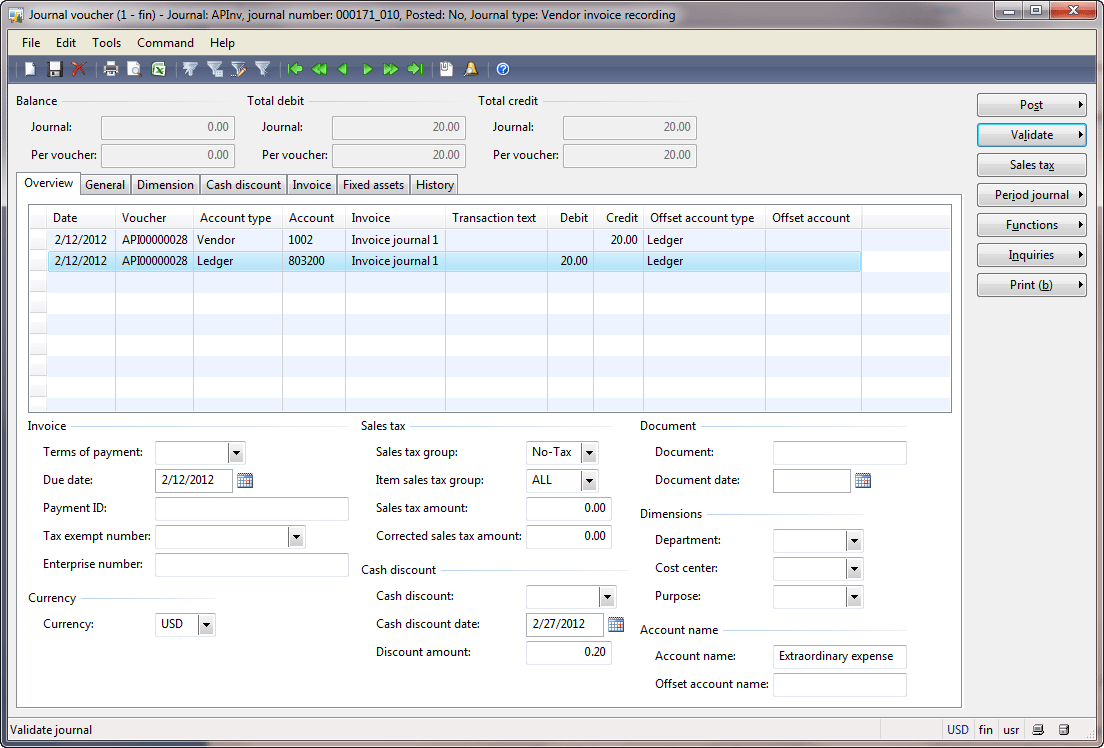
- In the Account field, select the 1002 vendor and fill in $20 in the Credit field.
- Fill in the Invoice number that is printed on the document. For example, fill in the “Invoice journal 1” in the Invoice field.
- The Accountant decides to use the 803200 (Extraordinary expense) account for the Sales Expense. Fill in 803200 in the Offset account field.

Journal voucher form
Pay attention to the following information:
- We have used different account types in one transaction (the Account type and Offset account type fields).
- The Terms of payment field defines the terms of payment, i.e. when the company should pay to the vendor. In our case, the term of payment is N030 (during 30 days). Microsoft Dynamics AX automatically defines the Due date.
- The Cash discount field defines the cash discount. In our case, the cash discount is 2%D10 (2% discount for 10 days). If the company pays during the first 10 days, it receives the 2% discount. In the next training lesson, we will pay this Invoice and check whether the cash discount is applied.
Since the transaction is balanced, i.e. Debit part = Credit part, we can validate and post the journal. Note that this transaction can be written in the following way.
- In the Journal voucher form, click the Validate > Validate button. The “Journal is Ok” message appears.
- Click the Post > Post button. The “Number of vouchers posted to the journal: 1” message appears. It means that the journal is posted.
Let’s check the general ledger transaction that was generated. In the Journal voucher form, click the Inquiries > Voucher button. The Voucher transactions form opens.

Voucher transactions form
We make sure that the 211100 account (Accounts Payable) was credited for $20 and the 803200 account (Services Expense) was debited. We can check the accounting equation with the help of the Balance sheet report (General ledger > Reports > Transactions > Periodic > Financial statement).
Let’s check whether the vendor transaction was generated. In the Voucher transaction form, click the Origin button to view all transactions for all ledgers. The Transaction origin form opens.

Transaction origin form
We can see that the Vendor transaction is created. Go to the Vendors form (Accounts payable > Common Forms > Vendor Details), find the 1002 vendor and click the Transactions button to make sure that the transaction exists.

Vendor transactions form
Usually the company doesn’t trust the employees who work in the purchase department, because the purchase agents can increase the price of the purchased items. For this purpose, the Invoice register and the Invoice approval journals are available. The Invoice register journal is used by all purchase managers. The Invoice approval journal is used by the senior purchase manager.
Let’s create and post one more Invoice for $20 for some vendor service:
- Go to Accounts Payable > Journals > Invoices > Invoice register. The Journal form opens.
- Create a new line. Select “APInvReg” in the Name field.
- Click the Lines button. The Journal voucher form opens.
- It is similar to the previous form. In the Account field, select the 1002 vendor.
- Fill in the invoice number. For example “Invoice reg & appr 1”.
- Fill in 20 in the Credit field.
- There is no offset account. Click the Validate > Validate button. The “Employee to approve the line is not specified” message appears. Fill in the Approved byfield.

Journal voucher form
- Click the Validate > Validate button again. The journal is valid now.
- Click the Post > Post button. The “Voucher is posted and transferred to the pool” message appears.
Check what general ledger transaction was created. In the Journal voucher form, click the Inquiries > Voucher button. The Voucher transactions form opens.

Voucher transactions form
The following accounts were used: 211320 was Debited and 211310 was Credited. 211310 is the “Invoice pending approval” account. This account belongs to Accounts payable. 211320 is the “Offset Invoice pending approval” account. This account belongs to the Accounts payable accounts. This is the trick when two accounts from one category are used. It helps post the intermediate values. From the accounting equation point of view nothing is changed, because the transaction has the following view:
| Accounts payable | Accounts payable | ||
| Debit | Credit | Debit | Credit |
| $20 | $20 |
Let’s check the other transactions from the other ledgers. In the Voucher transactions form, click the Origin button. The Transaction origin form opens.

Transaction origin form
We can see that the Vendor transaction was created.
The Senior Purchase Manager works with the Invoice approval journal:
- Go to Accounts Payable > Journals > Invoices > Invoice approval journal. The Journal form opens.
- Create a new line. Select “APInvApp” in the Name field.
- Click the Lines button. The Journal voucher form opens.
- Click the Fetch vouchers button. The Fetch vouchersform opens. The form contains the voucher that was posted in the Invoice registration journal.

Fetch vouchers form
- Click the Select button and then click OK.
- The Journal voucher form will look as follows:

Journal voucher form
The 211320 and 211310 accounts were used in the invoice registration posting, we can see that these accounts will be reversed. So, after the posting, the total amount (Credit – Debit) will equal zero. The 211100 (Accounts payable) account will be credited for $20. The Senior Purchase Manager checks the amounts and specifies the offset account. We have specified 803200 (Extraordinary expense) as the offset account. Fill in 803200 in the Account field.
- Click the Validate > Validate button. The “Journal is OK” message appears.
- Click the Post > Post button. The journal will be posted.
- Click the Inquiries > Voucher button to check the general ledger transaction that was generated.

Voucher transactions form
We can see that the same voucher number is used for the invoice registration journal and the invoice approval journal, because the general ledger transactions from both journals are available.
- Click the Originbutton to see all transactions for all ledgers.

Transaction origin form
As a result, one vendor transaction was generated, i.e. the vendor balance was changed. Balances of the 211100 and 803200 accounts are changed. Balances of the 211320 and 211310 accounts remain unchanged. The same result was when the Invoice was posted in one step with the help of the Invoice journal.
Only one question is left. Why were the 211310 (as Invoice pending approval), 211310 (as Invoice pending approval offset), and 211100 (as Accounts payable) accounts used?
All these accounts are set up in the vendor posting profile under Accounts payable > Setup > Posting profiles. We already define that “GEN” is used as a default. Go to the Setup tab:

Vendor posting profiles
For all vendors (except “90” – the intercompany vendors), the 211100 account is used as Accounts payable (or the summary), the 211310 account – as Invoice pending approval, and 211320 – as Offset Invoice pending approval.
In the next training lesson, we will pay for the delivered items and services, i.e. we will study the payment process.
Hi,
When i post Packing slip, i see 3 lines as shown below, what the significance of the first account number?
Voucher Date Year closed Ledger account
PSV-101485 3/19/2012 No 510310
PSV-101485 3/19/2012 No 211250
PSV-101485 3/19/2012 No 142100
Any plan for updating these documents for AX 2012?
Thanks