Other tab
On the Other tab, you may see the following fields: Check credit limit, Credit correction, Credit remaining qty, and Summary update for.

Posting packing slip form, Other tab
Check credit limit field
The Check credit limit field is used to validate if the company exceeds the Vendor credit limit. What is Vendor credit limit? For example, the vendor informs the company that the credit limit is 3000$. It means that the company can purchase items for 3000$ before actually paying for them. Let’s assume that the company purchases items for 3000$ from this vendor and the company needs another items from this vendor for 200$. In this case, the company must at least pay 200$ for the already delivered items and then purchase from this vendor. Vendor credit limit is set up under the following path Accounts payable > Common Forms > Vendor details > General tab > Credit field group > Credit limit field. The Check credit limit field has the following values:
- None. Vendor credit limit isn’t checked.
- Balance. Vendor balance after posting must be less than the vendor credit limit. Vendor balance is the amount of money that the company must pay. Vendor balance is increased after posting of an invoice. Vendor balance can be located under the following path Accounts payable > Common Forms > Vendor details > Balance button.
- Balance + Packing slip. Vendor balance + all vendor packing slip amounts must be less than the vendor credit limit. Packing slips details can be located by following the path Accounts payable > Common Forms > Vendor details > Inquiry menu button > Packing slip button.
- Balance + All. Vendor balance + all item amounts ordered from the vendor must be less than the vendor credit limit. In this case, even the purchase orders that are not posted are taken into account.
If the vendor limit is exceeded, the packing slip posting is terminated. Detailed example: Let’s assume that the Purchase manager needs to set up the credit limit for the Wind Televisions vendor (1002 vendor) to 150 000$. Credit limit includes the vendor invoiced balance and the packing slip balance. The Purchase manager creates two purchase orders for the following quantities:
- 100 LCD televisions (item1002) in the first order (it is 113 800$)
- 50 LCD televisions (it is 56900$) in the second order.
Create initial data:
- Make sure that the vendor balance is zero. Go to Accounts Payable > Common Forms > Vendor details > Find vendor 1002 > click the Balance button.

Vendor balance form
- Set up the vendor credit limit to 150 000$. Go to Accounts Payable > Common Forms > Vendor details > Find vendor 1002 > General tab > Credit field group. Find the Credit limit field and fill in 150 000.
The Purchase manager creates a purchase order for vendor 1002 and purchases 100 LCD televisions (1138$ for each television).
- Go to Account payable > Common Forms > Purchase order details.
- Create a new Purchase order for vendor 1002 with one line: Item number = 1002Configuration = HD Size = 37 Color = 01 Site = 2 Warehouse = 21 Quantity = 100
The Purchasу manager receives a packing slip from the vendor. After that the Purchase manager posts the packing slip:
- Click Posting > Packing slip menu button.
- Select All in the Quantity field.
- Fill in the Packing slip field with the number from the vendor packing slip document (you may fill in any value).
- Go to the Lines tab. Note that the Update field contains the value 100. It means that the packing slip will be posted for all quantity.
- The Purchase manager goes to the Other tab and selects Balance + Packing slip in the Check credit limit field.
- The Purchase manager clicks OK. The packing slip is now posted.
The packing slip has been posted because vendor invoice balance + vendor packing slip balance = 0 + 113 800. We see that everything is all right as the vendor open balance (113 800$) is less than the vendor credit limit (150 000$). The Purchase manager creates a purchase order for vendor 1002 and purchases 50 LCD televisions (1138$ for each television). Repeat the same steps as described earlier. The Purchase manager receives a packing slip from the vendor. After that the Purchase manager posts the packing slip. Repeat the same steps as described earlier. When the Purchase manager clicks OK in the Posting packing slip form, the following error message appears: “Credit limit exceeded: Balance 0.00, Order total 170,700.00, Account total 170,700.00 Credit limit 150,000.00, Exceeded 20,700.00”. The reason for this is – if the packing slip is posted, the vendor packing slip balance is 113 800 + 56900 = 170 700, but this is more than the vendor credit limit set to 150 000 which includes the packing slip balance and the invoice balance. Note: The Purchase manager can set up the credit limit type that will be populated in the Posting packing slip form by default. It is set up under the following path Accounts payable > Setup > Parameters > Credit rating tab > Credit limit type field.
Credit correction field
Select the Credit correction check box to display a credit note as a debit in your voucher transactions. This method is used in finance when a negative credit (debit) is used to correct an incorrectly recorded transaction. This kind of credit correction is also known as Storno. Detailed example: We will create the purchase order and post the packing slip. Then, we will create a new line in the purchase order with the negative quantity. Post the packing slip with the selected Credit correction check box. Then, again create a new line in the purchase order with the negative quantity and post the packing slip with the cleared Credit correction check box. Compare the results. Create the purchase order for the Rain Projectors vendor (1101 vendor) with one line for Projection Television (1005) item.
- Go to Accounts payable > Common Forms > Purchase order details.
- Create a new Purchase order for vendor 1101 with one line: Item number = 1005 Configuration = HD Size = 42 Color = 01 Site = 2 Warehouse = 21 Quantity = 100
Post the packing slip:
- Click Posting > Packing slip menu button.
- Select All in the Quantity field.
- Fill in the Packing slip field with the number from the vendor packing slip document (you may fill in any value).
- Go to the Lines tab. Note that the Update field contains the value 100. It means that the packing slip will be posted for all quantity.
- Click the OK button. The packing slip is now posted.
Create a new line in the purchase order with the negative quantity. And post the packing slip with the selected Credit correction check box. This approach can be used if the Purchase manager posts a greater quantity in the packing slip by mistake.
- Create a new line in the same purchase order: Item number = 1005 Configuration = HD Size = 42 Color = 01 Site = 2 Warehouse = 21 Quantity = -15
- Click Posting > Packing slip menu button.
- Select All in the Quantity field.
- Fill in the Packing slip field with the Selected value.
- Go to the Lines tab. Note that the Update field contains the value -15.
- Go to the Other tab and select the Credit Correction check box.
- Click the OK button. The packing slip is now posted.
Create one more line in the purchase order with the negative quantity. And, post the packing slip with the cleared Credit correction check box.
- Create a new line: Item number = 1005 Configuration = HD Size = 42 Color = 01 Site = 2 Warehouse = 21 Quantity = -15
- Click Posting > Packing slip menu button.
- Select All in the Quantity field.
- Fill in the Packing slip field with the Clear value.
- Go to the Lines tab. Note that the Update field contains the value -15.
- Go to the Other tab and clear the Credit correction check box.
- Click the OK button. The packing slip is now posted.
Let’s compare the results. We will now analyze the ledger transaction generated from Selected and Cleared packing slips.
- Click Inquiries > Packing slip in the upper part of the Purchase order form.
- The Packing slip journal form with three packing slips is shown.

Packing slip journal form
- Place the cursor on the Selected packing slip and click the Voucher button. The Voucher transactions form opens.
")
Voucher transactions form (selected Credit correction check box)
- Close the form. Place the cursor on the Cleared packing slip and click the Voucher button. The Voucher transactions form opens again.
")
Voucher transactions form (cleared Credit correction check box)
In steps 3 and 4, we can see that the amounts posted to ledger accounts are the same (see the Amount currency field). But the transaction created when the check box is selected has a negative sign in the Amount field. The 142100 ledger account contains the amount of received un-invoiced items. This amount was increased when a packing slip for 100 items was posted. When the Purchase manage posts a packing slip with the negative quantity, the received un-invoiced account is decreased. All ledge accounts have two virtual parts – debit and credit. So, there exist debit and credit amounts for a ledger account. When we post the packing slip for 100 items, the debit amount is increased by 92 300$ (see the voucher transaction for the first packing slip). When we post the packing slip for -15 items, with the selected Credit correction check box, the Debit amount is decreased by 13 845$. When we post the packing slip for -15 items with the cleared Credit correction check box, the Credit amount is increased by 13 845$.

Debit and credit parts of ledger account
Credit remaining quantity field
If during the posting of a credit note (quantity with the negative sign) the Credit remaining quantity check box is selected, the remaining quantity keeps on order. Otherwise, the remaining quantity is set to the deliver remainder quantity minus the credit note quantity.
Detailed example:
Let’s assume that the Purchase manager must purchase 100 Project televisions (item 1005) from the Rain Projectors vendor (1101 vendor). Rain Projectors deliver only 90 items and inform that another 10 items will be delivered later. The Purchase manager finds that 17 items are broken. The Purchase manager returns these items to the vendor and decides to reorder 17 new items.
The Purchase manager creates a purchase order for Rain Projectors (1101 vendor) with one line for the Projection television item (1005):
- Go to Accounts payable > Common Forms > Purchase order details.
- Create a new Purchase order for vendor 1101 with one line: Item number = 1005 Configuration = HD Size = 42 Color = 01 Site = 2 Warehouse = 21 Quantity = 100
The Purchase manager posts the packing slip for 90 items:
- Click Posting > Packing slip menu button.
- Select All in the Quantity field.
- Fill in the Packing slip field with any value.
- Go to the Lines tab. Type 90 into the Update field.
- Click the OK button. The packing slip is now posted.
Check the result on the Quantity tab.

Purchase order form, Quantity tab
The Purchase manager creates a credit note for 17 items. We assume that item 1005 is not used in the Warehouse Management System, so the Purchase manager updates the Receive now field directly to indicate that items are returned to the vendor. The Purchase manager posts the packing slip with the selected Credit remaining quantity check box.
- In the line area of the Purchase order form, go to the Quantity tab and type -17 in the Receive now field.

Purchase order form, Quantity tab, Receive now field
- Click the Posting > Packing slip menu button.
- Select Receive now in the Quantity field.
- Fill in the Packing slip field with the Selected value.
- Go to the Lines tab. Make sure that the Update field contains the value -17.
- Go to the Other tab and select the Credit remaining quantity check box.
- Click the OK button. The packing slip is now posted.
To check the result, we return to the Quantity tab in the Purchase order form. This tab contains detail information about the line quantities:
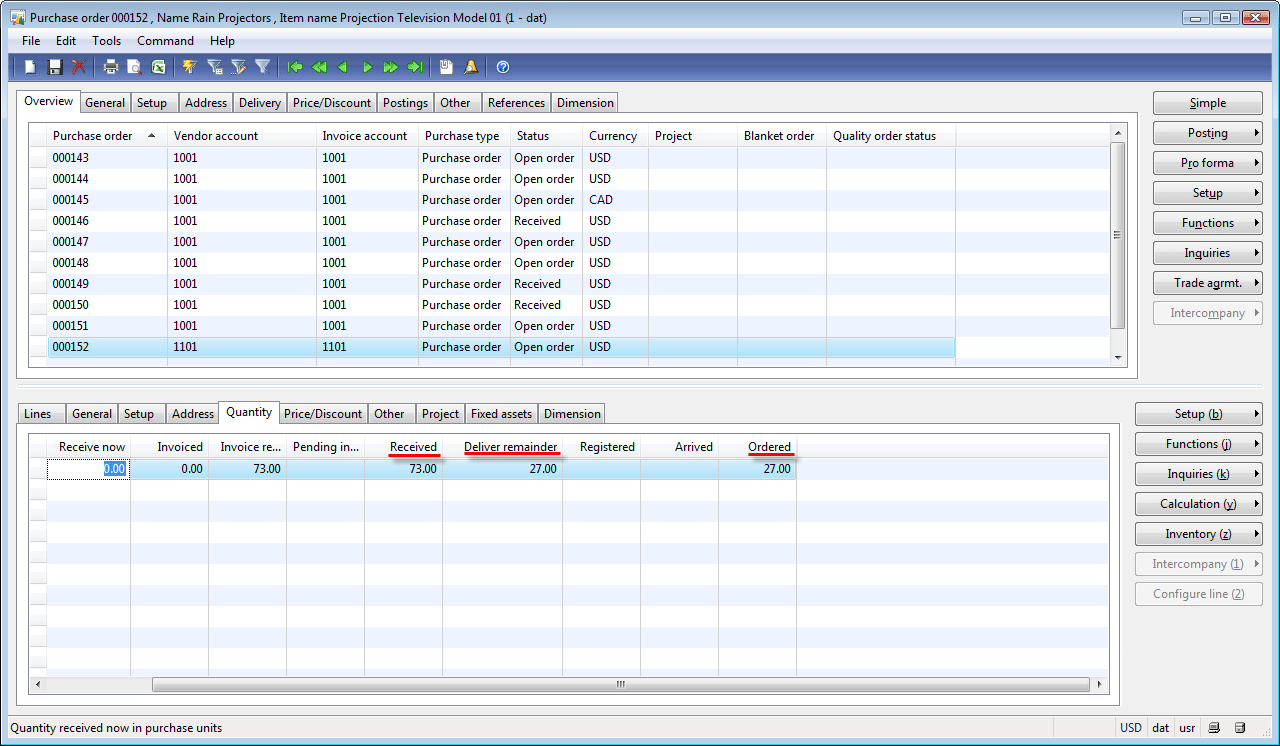
We can see that 73 items are received and 27 are ordered, i.e. the total item quantity remains 100. It means that 17 items have been reordered.
If the Purchase manager clears the Credit remaining quantity check box and post the packing slip, the Quantity tab would have the following view:

Purchase order form, Quantity tab after posting packing slip with cleared Credit remaining quantity check box
We can see that 73 items are received and 10 are ordered, i.e. the total quantity is 83 items. It means that 17 items have been returned to the vendor and no new items have been reordered.
Summary update for field
The Summary update for field determines how multiple purchase orders must be summarized in one packing slip.
The field is used when several purchase orders are taken into account during the posting process.
For example the Purchase manager receives one packing slip document from the vendor (for all purchase orders delivered) and wants to register this document into the system. There are several purchase orders but the packing slip document must summarize the information. In this case, the Purchase manager goes to Accounts payable > Periodic > Purchase order update > Packing slip periodic job. She or he then selects all orders for the vendor and selects Invoice account in the Summary update for field.
There are the following four summary update options available:
- None. No summary updates are processed.
- Invoice account. Use this selection to summarize multiple purchase orders into one packing slip. The summarize criteria are invoice account and currency.
- Order. Purchase orders are summarized by currency and invoice account into one packing slip. Difference between Order and Invoice account options is that in Order case all purchase order will be summarized if it is impossible the summary not performed. When you select Order another Purchase order field appears. In this field, you select which order summarizes all orders from the order range. If Order is selected, you must also set the packing slip number in the Packing slip field. This number will be used for the summarized packing slip.
- Automatic summary. Select this option to summarize multiple orders according to the criteria that is specified in the Summary update parameters (Accounts payable > Setup > Parameters > Summary update tab > Summary update parameters button).
Detailed example:
In this example, we create 3 purchase orders for the same vendor. Open the Posting packing slip form with the three packing slips. Note how the Summary update for field influences the number of packing slips documents.
- Create 3 purchase orders:
- Purchase order 1: Vendor = Earth Televisions vendor (1001 vendor account), Currency = USD
Purchase line: Item = LCD Television Model 01 (1001 item number), specify any item dimensions, Warehouse = 21 - Purchase order 2: Vendor = Earth Televisions vendor (1001 vendor account), Currency = USD
Purchase line: Item = LCD Television Model 01 (1001 item number), specify any item dimensions, Warehouse = 22 - Purchase order 3: Vendor = Earth Televisions vendor (1001 vendor account), Currency = CAD
Purchase line: Item = LCD Television Model 01 (1001 item number), specify any item dimensions, Warehouse = 21
- Purchase order 1: Vendor = Earth Televisions vendor (1001 vendor account), Currency = USD
- Go to Accounts payable > Periodic > Purchase order update > Packing slip. The empty Posting packing slip form opens.
- Select All in the Quantity field.
- Click the Select button. The Purchase update form opens. Clear the Purchase order field and fill in 1001 in the Vendor account field.

Purchase update form
- Click OK.
- The Posting packing slip form now contains 3 packing slips.
- Fill in the Packing slip field for all packing slips.

Posting packing slip form
- Go to the Other tab.
- By default the Summary update for field contains the None value.
- Select Invoice account in the field. Since we create three purchase orders for the Earth Televisions vendor, three packing slips must be summarized into one packing slip. But currencies must also be taken into account. So, as a result only two packing slips will be summarized.
- To update the grid, click the Arrange button. In my case the packing slip 1 and the packing slip 2 are summarized.

Posting packing slip form. Summary update for: Invoice account
- If we go to the Lines tab, we can find the lines from two purchase orders.

Posting packing slip form, Lines tab
- Select Order in the Summary update for field.
- Select the purchase order that will summarize all the other orders. I select purchase order 000157 in the Purchase order field.Fill in the Packing slip field with the number that will be used for the summarizing packing slip. Fill in 7.
- Click the Arrange button. The error message shows stating the following: “Cannot make summary update. The following fields are different: Currency.” It is because this type of summary sums all packing slips into one and if by some reason this cannot be done, an error message is shown and summing is not performed.
- To check the Automatic summary, we must set up what field will be used to summarize the packing slips.
- Go to the Accounts payable > Setup > Parameters > Summary update tab.
- And click the Summary update parameters button.
- The Summary update parameters form opens.

Summary update parameters form
- Specify the fields that must be equal on packing slips that will be summarized.
- Let’s include the Warehouse field. Select the Warehouse field in the Available field list and then click the left arrow button (<).
- Close the form.
- Automatic update will summarize the purchase orders with equal Invoice account, Currency, and Warehouse. In our case 3 purchase orders have one vendor (i.e. invoice account), two purchase orders have one currency but they have different warehouses. So no orders are summarized.
- Let’s check. Come back to the Posting packing slip form and select Automatic summary in the Summary update for field.
- Click the Arrange button.
- In the result, as it is expected, we will have three packing slips.

Posting packing slip form. Summary update for: Automatic summary
Note: Purchase orders have the same vendor, different currencies, and different warehouses.
Find information about other tabs: Parameters tab , Overview tab, Setup tab, Lines tab, Line details tab, Purchases tab, and Fixed assets tab.
3 Comments