Agenda
- Introduction
- Item group
- Inventory model group
- Inventory dimension group
- Setup inventory dimensions
- Create the Can item
- Summary
Introduction
All companies have a list of items (goods) to work with. Today, we will create a new item and discuss why some fields are mandatory. In Microsoft Dynamics AX, the list of items is maintained in the Item form located under Inventory management > Common Forms > Item details.
Let’s assume that our company resells bottles and cans, an inventory manager needs to create two new items in the Item form: Bottle and Can.
First, we create the Bottle item. Open the Item form (Inventory management > Common Forms > Item details) and press CTRL+N. In the Item number field, type 1. And, then type Bottle in the Item name field.

create new item
The Item group field contains a red wavy line which means it is a mandatory field. On the General tab, there are some other mandatory fields. They are the Item group, Inventory model group, and Dimension group fields. Refer to the following explanation why these fields are mandatory.
Item group
What should we know about the item Bottle? This question has several answers, for example, we need to know its color, size, price, and inventory unit. But, what is the Item group? We should answer simple questions what general ledger accounts will be used when we post an item transaction. Item transactions are created when an item is, for example, purchased or sold. In Microsoft Dynamics AX, we use the Item group to set up general ledger (or posting) accounts.
What are a general ledger accounts and why should we use them when purchasing or selling an item? This question will be disclosed in the Microsoft Dynamics AX Financial Training. But, before I will create it, you can understand the Financial area yourself. The great training about Accounting is stored here.
Now, I will try to explain some Financial concepts. Look at the following figure, a company from a financial point of view is a circle with assets, liabilities, and equity parts.
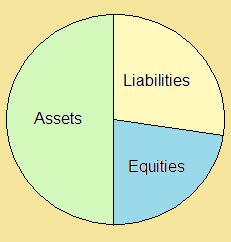
Company from financial point of view
Where Assets = Liabilities + Shareholder’s Equity. Assets are items and money that customers should pay to a company – bank accounts, cash, and fixed assets (for example machines that produce goods). Liabilities are money that a company should pay to vendors – payroll (salary to workers), tax amount, insurance, and bank loans. Shareholder’s Equity is the money that a company should pay to company investors or shareholders (amounts invested into the company by the owners plus the cumulative net income of the company that has not been withdrawn or distributed to the owners). Why is the Shareholder’s Equity separated from other parts of the circle? Because it contains the information about the amount of money that a company should return to shareholders (This is the main purpose of all companies =) ).
General ledger accounts are used to store the information (amount of money) about a concrete type of assets, liabilities, or Shareholder’s Equities. For example, in the Microsoft Dynamics AX demo data we have such accounts as Bank Account USD, Bank Account EUR, Accounts receivable (money that a company should pay to vendors), Car audio receipts, DVD player receipts, etc. (The path: General ledger > Common Forms > Chart of Accounts Details). Here, we can always find the information about, for example, how much money we spent for purchasing Bottles for the last month. If we don’t have a general ledger account how could we do this?

General ledger accounts
If a company keeps accurate records, the accounting equation will always be “in balance,” meaning the left side should always equal the right side. The balance is maintained because every business transaction affects at least two of a company’s accounts. For example, when a company borrows money from a bank, the company’s assets will increase and its liabilities will increase by the same amount. When a company purchases inventory for cash, one asset will increase and one asset will decrease. Because there are two or more accounts affected by every transaction, the accounting system is referred to as double entry accounting.
A company keeps track of all of its transactions by recording them in accounts in the company’s general ledger.
Let’s return to our Bottle item. We should create general ledger accounts for this item for any possible case. Luckily, I use the demo data and so do you. So, let’s use the existing Item group for the Bottle item. In my demo data, I select the Packaging item group.
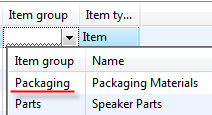
Item group
How can we find out what general ledger accounts are assigned to the item? We can do it by either right-clicking in the Item group field and selecting the Go to the main Table Form option or by opening the Item groups form (Inventory management > Setup > Item groups). In the Item group form, we see different tabs with many fields. All these fields contain the information about which general ledger accounts will be used to store the amount of money for specific item status (sold item, purchased item, purchased but not paid item, applied discount amount, etc.). For example, go to the Purchase order tab, the Invoice field group, Receipt field. This field contains a general ledger account that stores the amount of money that has been spent for purchasing. The Packing slip field contains the general ledger account that stores the amount of money that will be spend for the item that is already in a warehouse (Vendor hasn’t asked to pay for them yet).
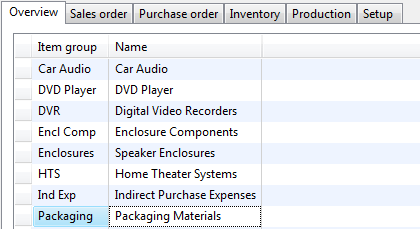
Item group form
Don’t be frightened right now as we will understand AX features when we discuss certain business processes.
Inventory model group
Why is this field mandatory? What else should we know about an item? As you understand it is not the size, weight, or color – it is something that all items must have. Let’s assume that a company purchases four items for the cost of $5 and three items for the cost of $6. So, the total items’ cost is 4*$5+3*$6=38$. The company sells two items. Now, there are 4+3–2=5 items in the company warehouse. And how much items’ cost remains?
Possible variants:
- (4 – 2) * $5 + 3 * $6 = $28 (the company has sold two items that cost $5)
- (4 – 1) * $5 + (3 – 1) * $6 = $27 (the company has sold one item that costs $5 and one item that costs $6)
- 4 * $5 + (3 – 2) * 6$ = $26 (the company has sold two items that cost $6).
We can’t answer this question accurately because we only know that there are six items remaining in the warehouse and we don’t know which items are sold. The first and the main purpose of the Inventory model group is to set up the rules for calculating of item cost (of those items that are still in the warehouse and those that are sold).
We can set up the following rules for an inventory models to calculate item’s cost:
- FIFO – First in First out. Means that the first purchased item is first sold. In our example, we purchased four items for the cost of $5 first, so these items will be first sold. After the items are sold, the items’ cost in the warehouse will be (4 – 2) * $5 + 3 * $6 = $28.
- LIFO – Last in First out. Meaning that the first purchased item is last sold. In our example, we purchased three items for the cost of $6 last, so these items will be first sold. After the items are sold, the items’ cost in the warehouse will be 4 * $5 + (3 – 2) * 6$ = $26.
- Weighted avg. – in this case, the average cost is calculated and subtracted from the warehouse items’ cost when the item is sold. In our example, the average cost is (4 * $5 + 3 * $6) / 7 = $5.43. After the items are sold, the items’ cost in the warehouse will be (7 – 2) * $5.43 = $27.15.
- Standard cost – this inventory model uses a specific price as cost. The price can be entered manually or calculated automatically. This price is used as cost for purchase and selling. For example, we have a standard cost price of $5.5. So, we purchase all items for this price ($5.5). The total items’ cost before the selling is 4 * $5.5 + 3* $5.5 = $38.5. After two items are sold, the items’ cost in the warehouse will be (7-2) * $5.5 = $27.5.
- LIFO date – this model equals to LIFO with the only difference being that purchase and selling dates are taken into account. For example, a company purchases four items for the cost of $5 on October, 11, three items for the cost of $6 on October, 11 and two items for the cost of $7 on October, 13. The company sells two items on October 11, but the Sales manager was out of office and didn’t post the sales. The Sales manager came back to the office on October, 13 and posted the sales backdate to October, 11. The sales posting process will decrease the cost of items in the warehouse at 2 * $6 (item’s last cost as of October, 11). If the LIFO inventory model is used, the sales process will decrease the cost of items in the warehouse to 2*7$ (because 7$ is the last cost received into the warehouse).
- Weighted avg. date. – this model equals to the Weighted avg with the only difference being that the average amount is calculated for a separate day. For example, a company purchases four items for the cost of $5 on October, 11, three items for the cost of $6 on October, 13 and two items for the cost of $7 on October, 13. The company sells two items on October, 13. The average cost price will be (3 * $6 + 2 * $7) / (3 +2) = $6.4, note that four items at the price of $5 are not included in the average cost price calculation because they have been purchased on another day.
We will use the FIFO inventory model group for the Bottle and Can items. The inventory model group called FIFO is already created in our demo data used for training.
You can create your own inventory model group. Go to Inventory management > Setup > Inventory > Inventory model group and create a new record with the following setup:
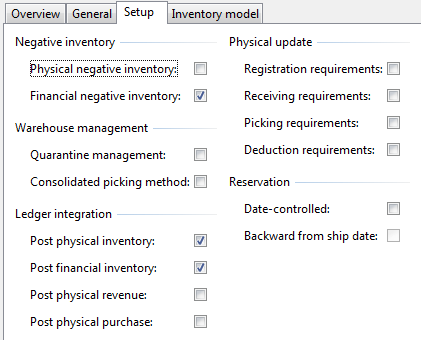
Setup tab
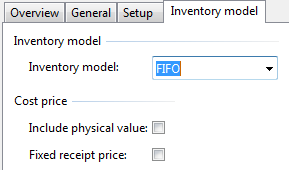
Inventory model tab
As you can see from screen shots an Inventory model group has a few more parameters. You can also specify the following parameters:
- Whether physical and financial negative inventory is permitted
- Whether inventory transactions are to be posted to the General ledger
- The workflow used when you send or receive items
- The reservation rules, when you create sales order lines for items where some or all of the quantity of the item has the status Ordered
These parameters will be explained later in practice.
Now, we assign an inventory model group to the Bottle item (back to the Item > General tab).
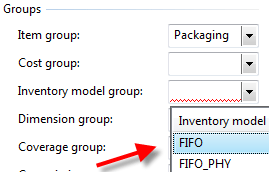
Assign inventory model group with Bottle item
Inventory dimension group
What else should we know about an item? That is the item and storage dimensions. Item dimensions characterize an item by size, color, and configuration. Storage dimensions characterize an item by location, warehouse, serial number, etc. Item and storage dimension are known as Inventory dimension. Inventory dimensions are used to define physical characteristics of inventory items. Dimensions control how items are stored and drawn from inventory and enable inventory to be managed on a more detailed level.
Microsoft Dynamics AX provides the following Item dimensions:
- Size
- Color
- Configuration
Storage dimensions are as follows:
- Site
- Warehouse
- Batch number
- Location
- Pallet ID
- Serial number
For the Bottle item, we will use the Size and Color item dimensions and the Site and Warehouse storage dimensions.
Find or create a new inventory dimension group. Go to Inventory management > Setup > Dimensions > Dimension groups. If you use our demo data, find the appropriate dimension group (i.e. with Size, Color, Site, and Warehouse dimensions active).
Or create yours:
- Create a new record by pressing CTRL+N.
- Fill in the dimension name; for example, CS-W.
- Save the record by pressing CTRL+S.
- Select the Active check box for the Size and Color item dimensions, and note that the Site and Warehouse storage dimensions have already selected by default.

Item and Storage dimensions areas
The Inventory dimension form also contains a lot of fields. The functions of these fields will be explained later.
Now, go to the Item form (Inventory management > Common Forms > Item details > General tab) and assign the inventory dimension group to the Bottle item.
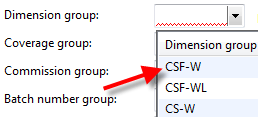
Assign inventory dimension group with Bottle item
Now all item’s mandatory fields are filled in, we can save the record in the Item form. The Bottle item is now created.
Setup inventory dimensions
For the Bottle item, we select the CS-W dimension group with the Color and Size item dimensions active. Let’s create a value for these dimensions.
First, create a value for the Size dimension:
- In the Item form, click Setup > Sizes. The Sizes form opens.
- Create two records with size dimensions 0.33 and 0.5.
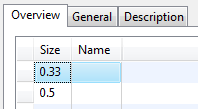
Bottle item’s size dimensions
Then create a value for the Color dimension:
- In the Item form, click Setup > Colors. The Colors form opens.
- Create records for the following three colors: Blue, Red, and Green.
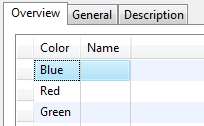
Bottle item’s color dimensions
An item may be of different sizes and colors but a company may not purchase and/or sell item in every dimension combination. Available item dimension combinations must be created in the Combinations of item dimensions form. We will work with the Bottle items with the following dimension combinations:
- 0.33 Blue, Red, Green
- 0.5 Blue and Red (0.5 Green Bottle doesn’t exist)
To create these dimension combinations, do the following:
- In the Item form, click Setup > Item dimension combination.
- In the Combinations of item dimensions form, create a new record by pressing CTRL+N. Select 0.33 in the Size field and Blue in the Color field. Save the record by pressing CTRL+S).
- Click the Create Combinations button. This button can help in creating the item dimension combinations for a new item. If we click this button, dimension combinations that do not exist are shown.
- In the Combinations of item dimensions form, click the Select All button and then click OK. All possible dimension combinations are created. Note that the form has the same name as the initial form.
- Since there is no Bottle item of the size 0.5 and of Green color, we delete this record from the initial form. (Select the record and press ALT+F9).

Item dimension combinations
Create dimension combinations automatically.
It is a very tedious process to activate a dimension combination when a new dimension value is created. If an item must have a dimension combination for all dimension values, we can set up Microsoft Dynamics AX to activate new dimension combinations automatically.
To achieve this, do the following:
- In the Item form, click the General tab -> Item dimension – Setup field group
- Select the Autocreate combination check box.
Now, create the Orange color dimension (click Setup > Colors). Make sure that the new dimension combinations 0.5 Orange and 0.33 Orange are created (click Setup > Item dimension combinations).
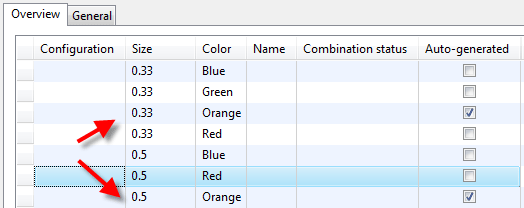
Item dimension combinations
Note that automatically created combinations have the Auto-generated check box selected.
Create the Can item
Now, we will create the Can item. It has similar parameters to those of the Bottle item. We will use the Bottle item template for this purpose.
To create the Bottle template, do the following:
- In the Item form, right-click the Bottle record and select the Record info option from the menu. The Record information form appears.
- Click the User template button. The Create template form opens. (This template will be available for the current User only. The template approach can be used for all forms in Microsoft Dynamics AX).
- Enter the template name Bottle in the Create template form.
- Click OK. And close the Record information form.
After a template is created, Microsoft Dynamics AX automatically shows the Select a template for Item form when we create a new item in the Item form.

Select a template for Items form
To create the Can item, do the following:
- In the Item form, click CTRL+N.
- Select the Bottle template from the Select a template for Items form and click OK.
- Type 11 in the Item number field and Can in the Item name field.
- Make sure that all mandatory fields are filled in. Save the record.
Note: Item dimensions are not transferred from the Bottle item. So, we need to create new Size and Color dimensions and activate them in the Dimension combination form.
Create the following Sizes and Color dimensions for the Can item and activate them:
- Standard Black
- Standard Blue
- Double Black
- Double Blue
Summary
In this lesson we have created a first items, got acquainted with mandatory fields, and given consideration to the Item group, Inventory model group, Dimension group.
Our Company has two items to work with: Bottle and Can. The items have the following setup:
- Packaging item group with specific general ledger accounts
- FIFO inventory model group
- CS-W dimension group with active Color, Size, Site, and Warehouse dimensions
The Bottle item is set up with the following dimension combinations:
- 0.33 Blue
- 0.33 Green
- 0.33 Red
- 0.33 Orange
- 0.5 Blue
- 0.5 Red
- 0.5 Orange
The Can item has following dimension combinations:
- Standard Black
- Standard Blue
- Double Black
- Double Blue.
We have finished setting up the company’s item list. Now, we will work with these items purchasing and selling it. In the next training, we will learn the process of purchasing an item.

Thank you very much. This would really help and also understand what is Axapta.
Thanks a lot. its very helpful for a technical person like me.
Its really very helpful for a developer…
Awesome work !!! This link is really useful for the people you wanted to learn functinal aspects of AX and a easy way to make DEV understand the inventory life-cycle.
Thanks again 🙂 Keep up the good work
Hello,
Could you let me know the account 130300, 141050, 510190, 401190, 520100 what it is in the Inventory posting?
this could be of great help to me.
could u provide me the chart of accounts for the above accounts please?
Thank you,
Can I apply discount for Items Group and link it to specific Customer Group.
very helpful. thanks!
Thanks a lot, its really simple and comprehensive clarification for dynamics trainer.