Agenda
Introduction
In this training lesson, we are going to create a Customer and a Sales order.
From the previous lesson, we have the following information:
- The Sales Manager has found a Customer
- The Customer wants to purchase 1,000 items Bottle Red 0.5 and 200 items Can Standard Black
Create Customer
The Sales Manager creates a record for the Customer in the system:
- Go to Accounts receivable > Common Forms > Customer Details. The Customers form opens.
- Create a new line by pressing CTRL + N and fill in the Customer information. (We assume that the Sales Manager has already acquired the necessary information from the Customer). All the other fields remain filled in by default.
- Click the Overview tab and fill in the following fields:
- Customer account = 1000
- Name = Natural Juice
- Customer group = 20 (Major customers). Customer group is used to group customers that have common properties, such as terms of payment, settle period, ledger posting table for inventory transactions. You can read about the ledger posting table for inventory transactions here (the article describes a vendor group).
- On the Setup tab, enter the following information:
- Delivery terms = FOB_DS (FOB destination). Delivery terms answer the following questions: which party (a buyer or a seller) pays for which shipment and loading costs and which party takes the responsibility for the goods. FOB (from wikipedia) – Free on board means that the seller delivers when the goods pass the ship’s rail at the named port of shipment. This means that the buyer has to bear all costs and risks of loss or damage to the goods from that point. If we go to the FOB_DS parameters (Accounts receivable > Setup > Distribution > Terms of delivery > find FOB_DS record > Setup tab), we can find that the Freight charge terms field contains N/A (not available). It means that delivery charges are not included in an invoice and all delivery charges must be paid by the Customer himself/herself.
- Mode of delivery = 10 (Truck)
- Receipt calendar = Standard. Receipt calendar is used to specify days of week when the Customer can receive the items.
- Click the Sales order tab (we assume that the items for this Customer will be taken from the warehouse 11).
- Site = 2
- Warehouse = 21
- On the Address tab, fill in the following information:
- Name = Main
- Address type = Delivery
- Street name = 678 Central Avenue
- ZIP/Postal Code = 30005
- City = Alpharetta
- County = FULTON
- State = GA
- Country/region = US
Create sales order
Now, the Sales Manager can proceed to create a Sales order.
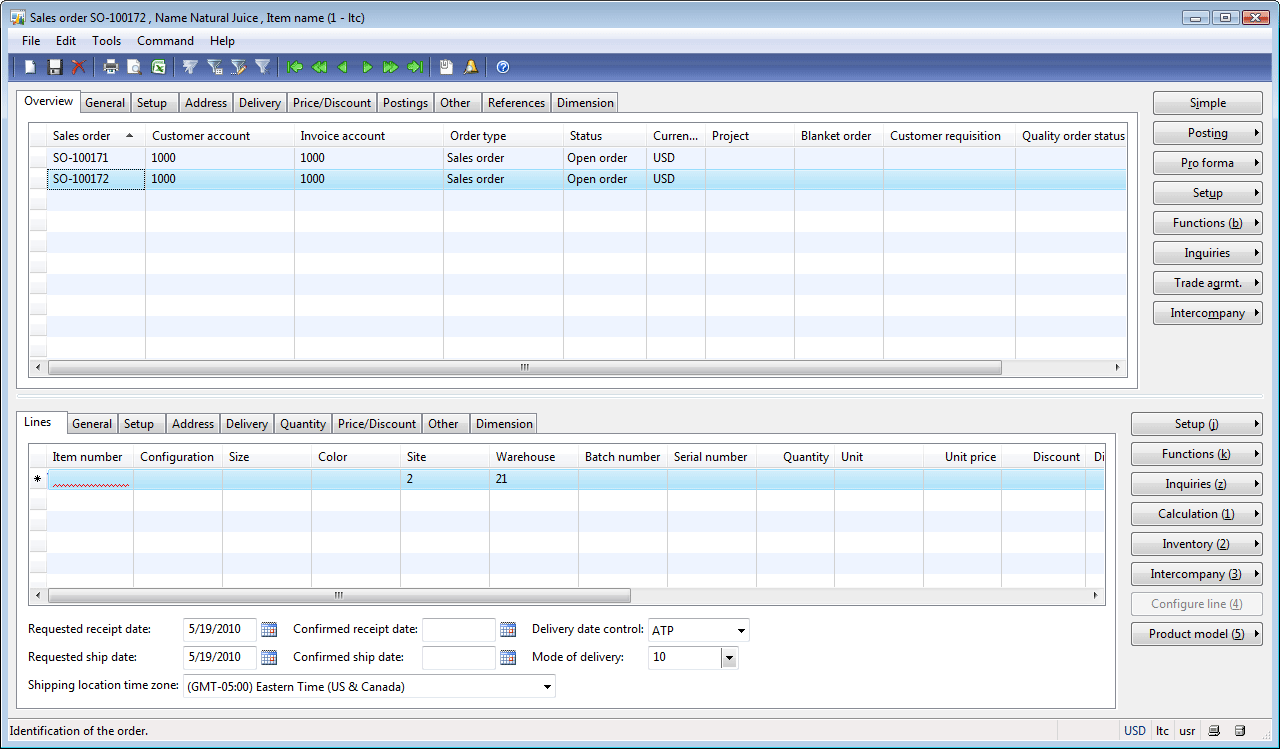
Go to Accounts receivable > Common Forms > Sales order details. The Sales order form opens.
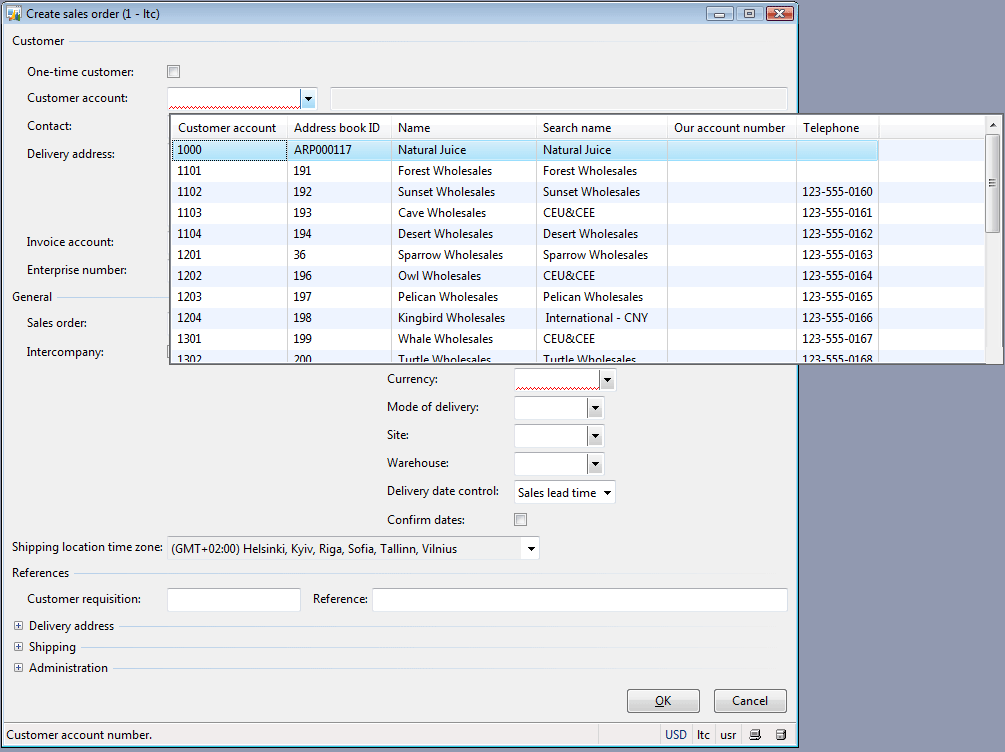
Create a new line by pressing CTRL + N. The Create sales order form opens.
Select 1000 in the Customer account field.
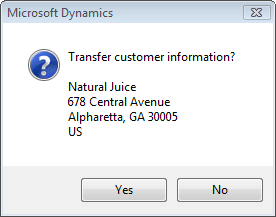
If the Prompt for customer information check box is selected (Accounts receivable > Setup > Parameters > General tab > Setup field group > Prompt for customer information check box), the following dialog box appears:
Click Yes.
All customer information will be transferred to the Sales order. Note that the Sales order information will be transferred to a sales line when it will be created.
Prior to clicking the OK button in the Create sales order form, let us discuss several fields.
The Delivery date control field is used to define the algorithm of calculating the available receipt date. Delivery date control function is used to primarily give realistic and complete delivery promises to a customer during a sales order entry and shorten the sales order entry time.
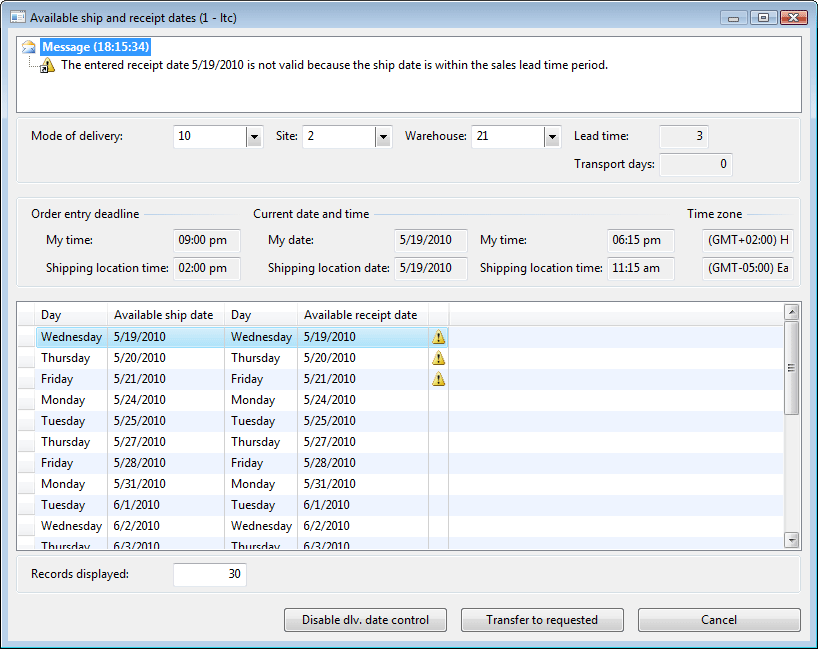
For example, the Customer asks to deliver items today. The Sales Manager enters the current date in the Requested receipt date field. As a result, the Available ship and receipt dates form opens. This form contains the information that the entered date is not valid. The form grid contains the information about the available dates.
The Sales Manager informs the Customer that the items can be delivered only on May, 14. If the Customer agrees, the Sales Manager sets the cursor in the 5/14/2010 line and clicks the Transfer to requested button.
Why are the records for Tuesday, Wednesday and Thursday not available? Axapta has two types of delivery date control – Sales lead time and Available to Promise (ATP). Sales lead time calculates the first available date in the following manner: current date + sales lead time. The following parameters are taken into account: coverage calendar, order entry deadline, customer receipt calendar, transport time, and transport calendar. We will discuss all these parameter later in this training. Our demo data already contains setup for sales lead time: Accounts receivable > Setup > Parameters > Shipments tab > Delivery control field group > Sales lead time field. Sales lead time is 3 days.
For example, the company knows that ALL items for the sales order can be purchased, received into the warehouse, and shipped to the Customer within 3 days. In this case, the Sales Manager enters 3 in the Sales lead time field for the sales order.
The sales lead time can be set up under the following path:
- For a sales order: Accounts receivable > Setup > Parameters > Shipments tab > Delivery control field group > Sales lead time field.
- For an individual item: Inventory management > Common Forms > Item details > select necessary item > Setup button > Site specific order settings > Sales order tab > select the Override check box > Sales lead time field.
- For an individual item and a Customer: Inventory management > Common Forms > Item details > select necessary item > Trade agrmt. button > Sales price button > Delivery field group > Lead time field.
Note: When an item is added to the Sales order, the requested receipt date is verified (if verification is not successful, the Available ship and receipt dates form opens).
ATP (Available to promise) is a more interesting method. ATP provides a response to the customer’s order enquiries based on resource availability. It generates available quantities of the requested product and delivery due dates. ATP supports order promising and fulfillment aiming to manage the demand and match it to production plans. This method does not use the Sales lead time and calculates the available date base on the following:
- Issues and receipts (only primary stocking is considered)
- Issues and receipts from the planned orders
Like the Sales lead time method, this one also takes into account the following parameters:
- Coverage calendar
- Order entry deadline
- Transport time
- Transport calendar
- Customer receipt calendar
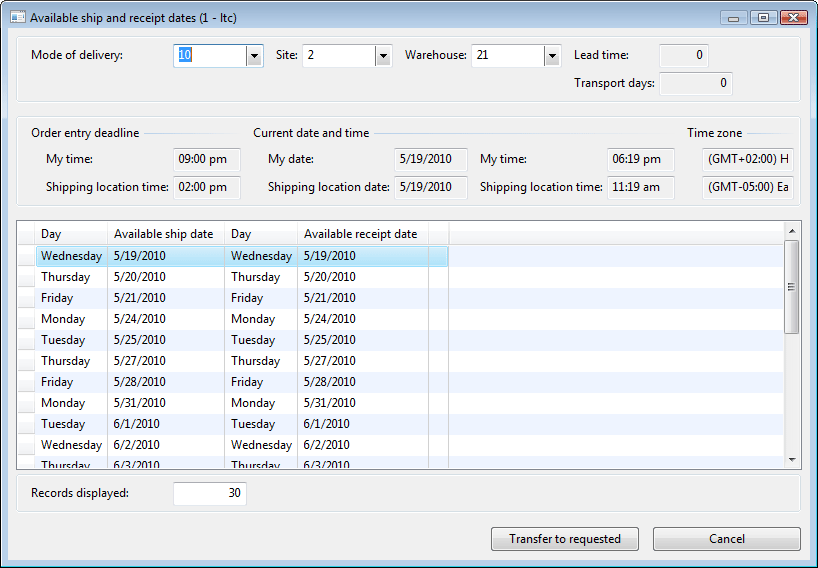
If we select ATP in the Delivery date control field, the Requested receipt date is changed to the current date. When we click the Simulate delivery dates button, the following information is shown in the Available ship and receipt dates form.
We can see that all dates from today are available. This happens because we have not set the time fence for the ATP calculation. (If we, for example, set the time fence for 10 days, all days remain available because the sales lead time is not used and no sales order line exists.) When we create a first sales order line, the system recalculates the available receipt date based on the item availability. So we will discuss the ATP method a little later when creating a sales order line.
Having returned to the Create sales order form, the Sales Manager selects ATP in the Delivery date control field.
The Delivery address field group contains the Customer address. The Information is transferred from the Customer form.
The Shipping field group contains the information about delivery terms. The Information is transferred from the Customer form as well.
The Administration field group contains the information about the Recipient (is taken from Administration > Users > select current user > User relations button > General tab > Employee field) and the Sales responsible (this employee receives commission for a sale).
The Sales Manager clicks the OK button. A Sales order with no lines is created.
Now, the Sales Manager can proceed to create sales order lines:
- In the line area, select the Bottle item in the Item number field.
- Select 0.5 in the Size field.
- Select Red in the Color field.
- The Site field is filled in from the sales order with the value 2.
- The Warehouse field is also filled in from the sales order with the value 21.
- Fill in 1000 in the Quantity field.
- Unit price is automatically filled in from the Item form. (Remember that we have set up a sales price for an item in this training).
- Save the line by pressing CTRL +S.
We may note that the Requested receipt date for the line is the current date + 1. Let’s now analyze how the ATP works.
Available to promise (ATP)
As we said earlier, ATP provides an available receipt date to the customer’s order enquiries based on resource availability.
The following parameters are taken into account:
- ATP time fence – it is the number of days that will be considered. Let’s set the ATP time fence to 10 days. Go to Accounts receivable > Setup > Parameters > Shipments tab > Delivery control field group > ATP time fence field and type 10. Note: The ATP time fence can be set up for an individual item under Inventory management > select necessary item > Setup button > Site specific order settings > Sales order tab > select the Override check box > ATP field group > ATP time fence field.
- Issues and receipts (only primary stocking is considered). Find the primary stocking dimensions for the Bottle items:
- Go to Inventory management > Common Forms > Item details. The Item form opens.
- Find the Bottle item and locate its dimension group (Item form > General tab > Groups field group > Dimension group field).
- It is the CS-WLP dimension group. We have set up this group in this training lesson.
- Right-click in the Dimension group field and select Go to the Main Table Form. The Inventory dimensions form opens. This form contains the dimension setup. Find the dimensions with the Primary stocking check box selected. These are Size, Color, Site, and Warehouse, so this dimension is a primary stocking.
Let’s check the issue and receipt.
- Go to Inventory management > Common Forms > Item details. The Item form opens.
- Find the Bottle item and then click the Transactions button.
- In the Transactions form, click the Inventory > Dimension display button, select all dimensions, and then click OK.
- Now, among all transactions, find the transactions with primary stocking dimensions same as those of the sales order line dimension. No receipt transaction exists, because in the previous lessons we received the purchased item to warehouse 22. Warehouse 21 doesn’t contain the required item. No issue transaction also exists, because it is our first sale.
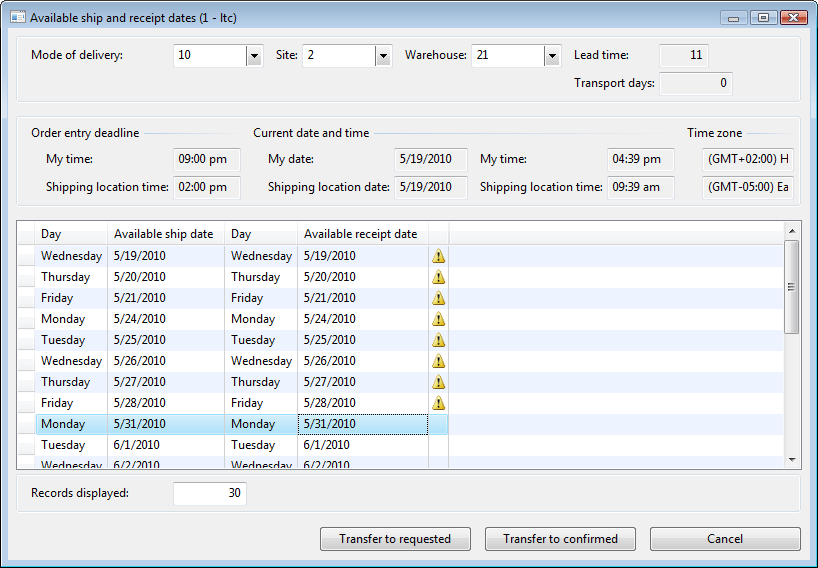
Since there are no items in warehouse 21, we can’t promise any receipt date for the Customer. Check if we have correctly reflected on the issue. Return to the Sales order form, in the line area, go to the Delivery tab and click the Simulate delivery dates button. The following form opens.
Since the ATP time fence is 10 days, the item can’t be delivered to the Customer during this period because the on-hand values are zero. The Sales Manager can’t promise anything.
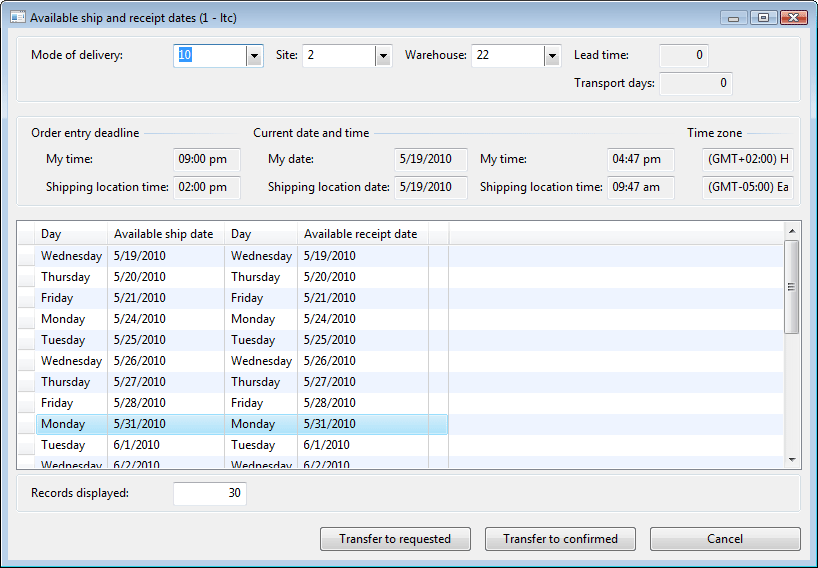
The Sales Manager decides to take the item from warehouse 22. The Sales Manager returns to the Sales order line and fills in 22 in the Warehouse field. Then, the Sales Manager opens the Available ship and receipt dates form again and finds the following results.Now, the Sales Manager can select any date because the item is available in the warehouse.
- Issues and receipts from the planned orders. This parameter is only taken into account if the ATP incl. planned orders check box is selected
- Global setup: Accounts receivable > Setup > Parameters > Shipments tab > Delivery control field group > ATP incl. planned orders field.
- Per item: Inventory management > Common Forms> Item details > select necessary item > Setup button > Site specific order settings > Sales order tab > select the Override check box > ATP incl. planned orders field.
- Coverage calendar is used to specify the dates when a warehouse works i.e. items can be shipped from the warehouse. The coverage calendar for the warehouse is set up under Inventory management > Setup > Inventory breakdown > Warehouses > Master planning tab > Item coverage field group > Calendar field. In the coverage calendar, you can set up open and closed days for the warehouse. If the requested shipping date falls on a closed day, then the next open day is used for the requested shipping date. If you do not set up a coverage calendar, the open and closed days defined in the company shipping calendar are used (Basic > Company information > Other tab > Shipping field group > Shipping calendar field).
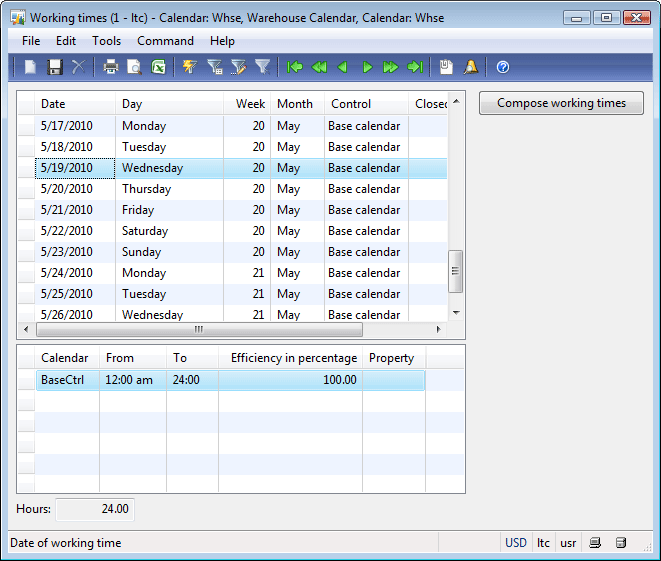
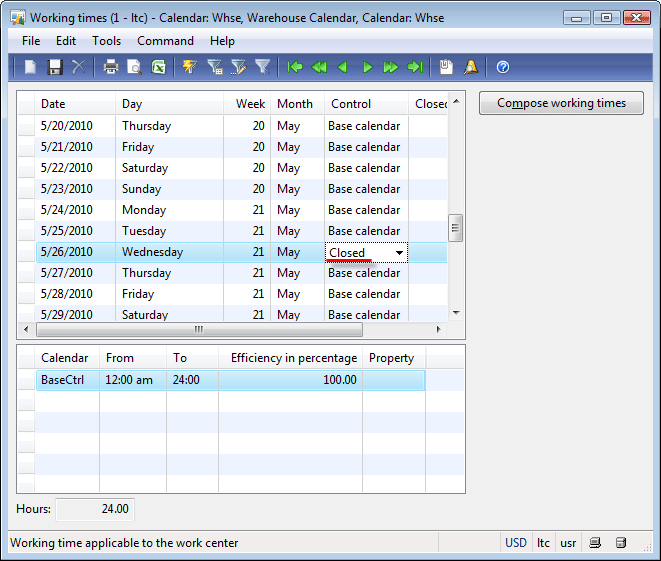
In our case, Coverage calendar = Whse. Let’s look what information is in this calendar: Go to Basic > Calendar > find the Whse calendar > click the Working times button. The Working times form opens.Calendar days’ controls are taken from the BaseCtrl base calendar. If we open the Working times form for the BaseCtrl calendar, we can see that on Monday the warehouse works 24 hours from 12:00 AM to 24:00. If we set the cursor to Saturday or Sunday, we can see that the warehouse doesn’t work. i.e. the warehouse works 5 days except Saturday and Sunday. Let’s assume that the warehouse doesn’t work on 5/26/2010. Find this date in the Working times form and select Closed in the Control field.
Now, we will check the result. Return to the Delivery tab of the sales order line and click the Simulate delivery date button.
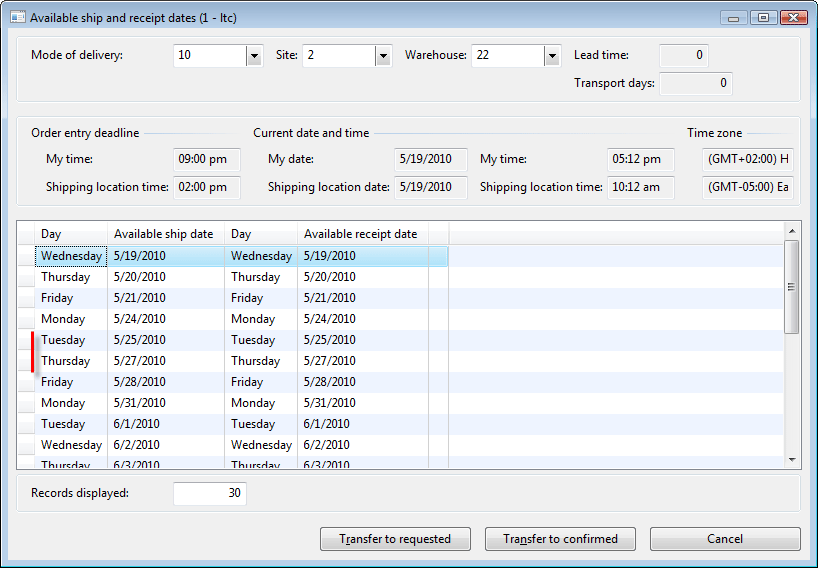
We can see that there is no 5/26/2010 date in the form.
Make the 5/26/2010 date available by yourself - Order entry deadline determines the cut-off time after which orders are shipped one day later. It is possible to set up an individual order entry deadline for a site (a group of sites) and a customer (a group of customers).
Each customer can be assigned to an order entry deadline group under Accounts receivable > Common Forms > Customer details > Sales order tab > Sales order field group > Order entry deadline group field. A site is assigned to an order entry deadline group under Inventory management > Setup > Inventory breakdown > Sites > General tab > Order entry field group > Order entry deadline group field.
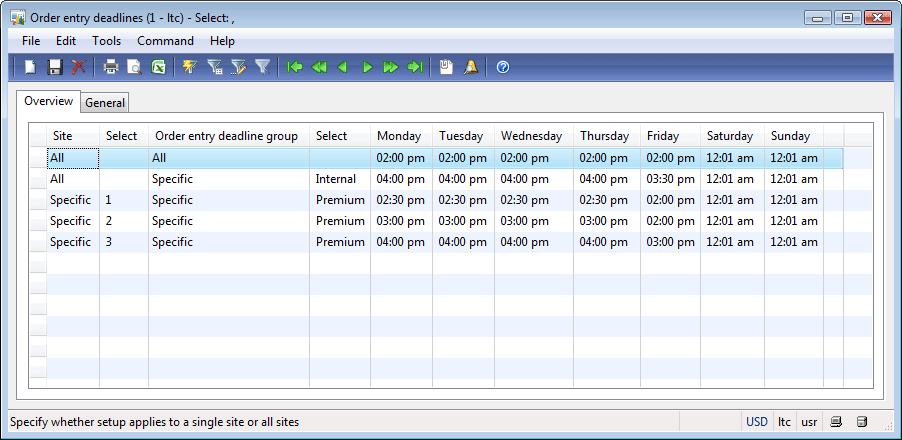
Let’s assume that in our company the order entry deadline is set to 14.00 for all customers and all sites. Go to Inventory management > Setup > Distribution > Order entry deadlines. The Order entry deadlines form opens.As we can see, our demo data already contains the record with required values. I mean the first record which shows that for all sites and all customers the order entry deadline is set to 14.00 during 5 working days.
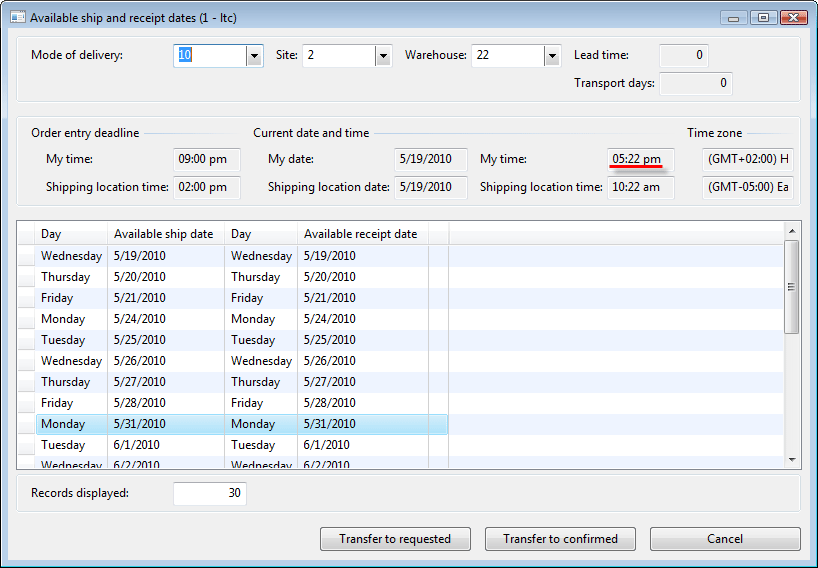
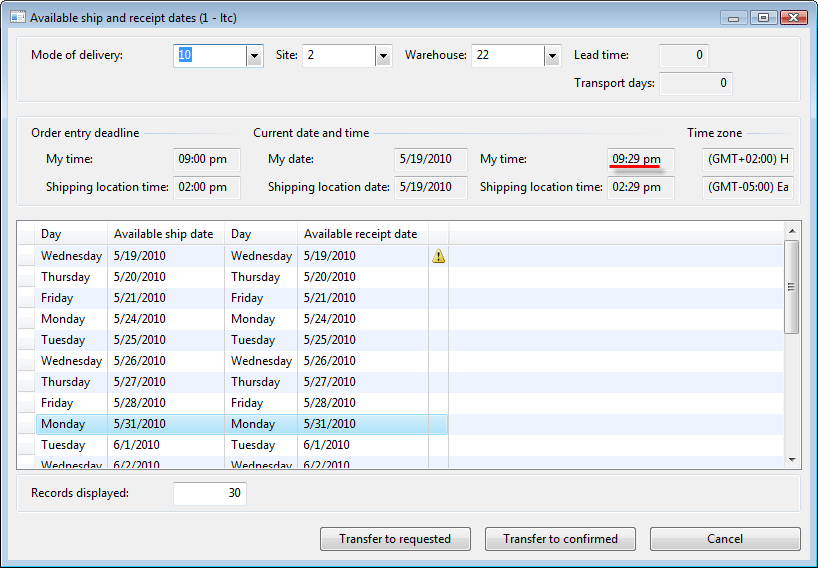
Let’s check how it works. Return to the sales order line, go to the Delivery tab, and then click the Simulate delivery dates button. Let’s check the Available ship and receipt dates form more attentively.Now, my time is set to 17:22, we set up the order entry deadline to 14:00, but the system allows using the 5/19/2010 date as a receipt date. Why doesn’t the system shift the available receipt and ship date to one date? This happens because that order entry deadline is set up for a warehouse. But, a warehouse can be situated in one place and the Sales Manager in another place. Let’s check if I am the Sales Manager and I sit in Kyiv, Ukraine. My time is 17:22 and the Time zone is GMT +2. Where is the Warehouse situated? Go to Inventory management > Setup > Inventory breakdown > Warehouses > find warehouse 22. This warehouse belongs to site 2. Go to the site parameters under Inventory management > Setup > Inventory breakdown > Sites > find site 2 > General tab > Order entry field group > Time zone field.
We see that the warehouse is situated in the GMT -05 time zone. Since the order entry deadline is set up for warehouse other than the order entry deadline for the Sales Manager who is located in Kyiv, the time will be calculated as follows 14:00 + (2:00 – (-5:00)) = 21:00. We can find this information in the Available ship and receipt date form (Order entry deadline field group > My time field). The available receipt (ship) date will be one day shifted only if the Sales Manager will find available dates after 21:00. You can check this if you temporarily set the time on your computer to 21:00. I set it and click the Simulate delivery dates button in the sales order line. The following result appears:
It is the expected result. Unfortunately, we can’t click the warning icon and get detailed description about the reason. Let us hope this will be possible the future version…
Don’t forget to set the right time on your computer 😉 - Transport time. Set up the transport time between a warehouse in your company and a customer address in the Transport form. This form is opened by clicking Inventory management > Setup > Distribution > Transport.
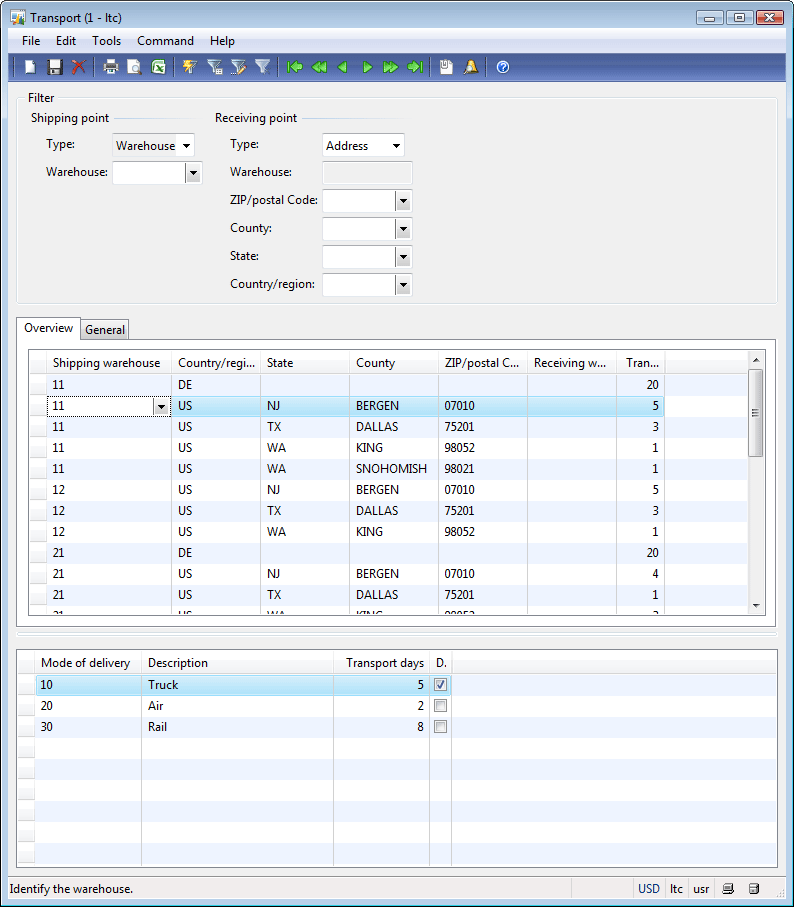
Let’s assume that the transport time between warehouse 22 and the Customer 1000 (Natural Juice) is 3 days by truck. And now, check how the result in the Available ship and receipt date form is changed.
- Open the Transport form by clicking Inventory management > Setup > Distribution > Transport.
- Fill in 30005 in the ZIP/postal Code field under Filter field group > Receiving point field group (30005 is the Customer’s ZIP/Postal code).
- Create a new record by pressing CTRL + N.
- Select 22 in the Shipping warehouse field.
- Save the line.
- Create a new line in the lower part of the form.
- Select the Truck mode of delivery (fill in 10 in the Mode of delivery field).
- Fill in 3 in the Transport days field.
- Save the line.
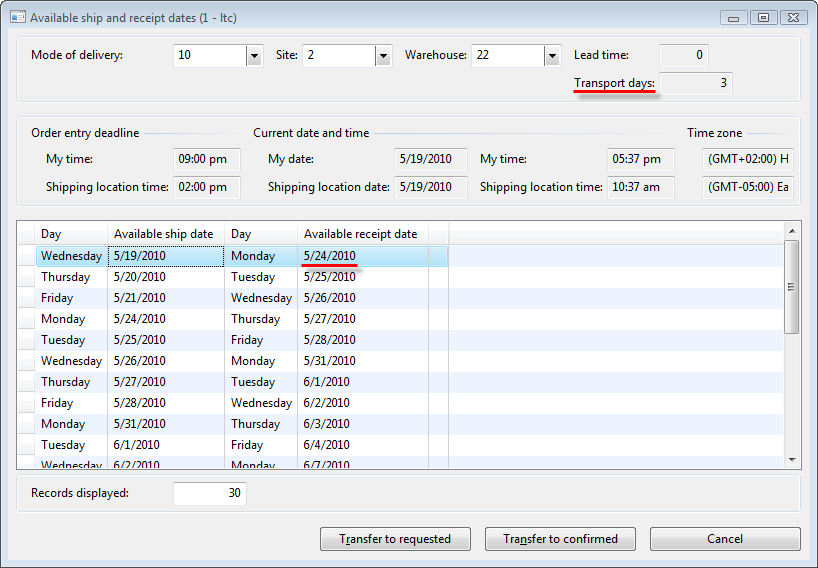
Check the result in the Available ship and receipt date form. Go to the line area, click the Delivery tab, and then click the Simulate delivery dates button. The following result shows:
We can see that the available receipt date is changed, because the transport days value is set to 3. Is it interesting to know what happens if the Sales Manager requests available dates after 21:00 (the order entry deadline)? The available date is shifted to one day (to May, 25). You can check this yourself. One note: If a sales order line contains only a site (without a warehouse), the transport time in the Transport form is searched for a fallback warehouse. This is set up under Inventory management > Setup > Distribution > Fallback warehouse for site.
- Transport calendar is used to set up open days for the transport. Transport calendar can be set up per mode of delivery or per mode of delivery in a specific warehouse. Transport calendar is set up under Accounts receivable > Setup > Distribution > Modes of delivery > select Truck mode > Transport calendar button > find warehouse 22. We can find the Transport1 calendar under Basic > Calendar. If we click the Working times button, we can see that 5 working days are open in the transport calendar (see the 24Hours base calendar).
- Customer receipt calendar is used to specify open days for the Customer. If no receipt calendar is specified for the customer, all days are open days for the Customer.You can specify the customer receipt calendar under Accounts receivable > Customer details > Setup tab > Delivery field group > Receipt calendar field.For Customer 1000, the Receipt calendar field contains the Standard value. If we go to Basic > Calendar, we can find that the open days for the customer are from Monday to Friday (see the BaseCtrl calendar since this is a base calendar).
Summary
We have studied how available dates are calculated.
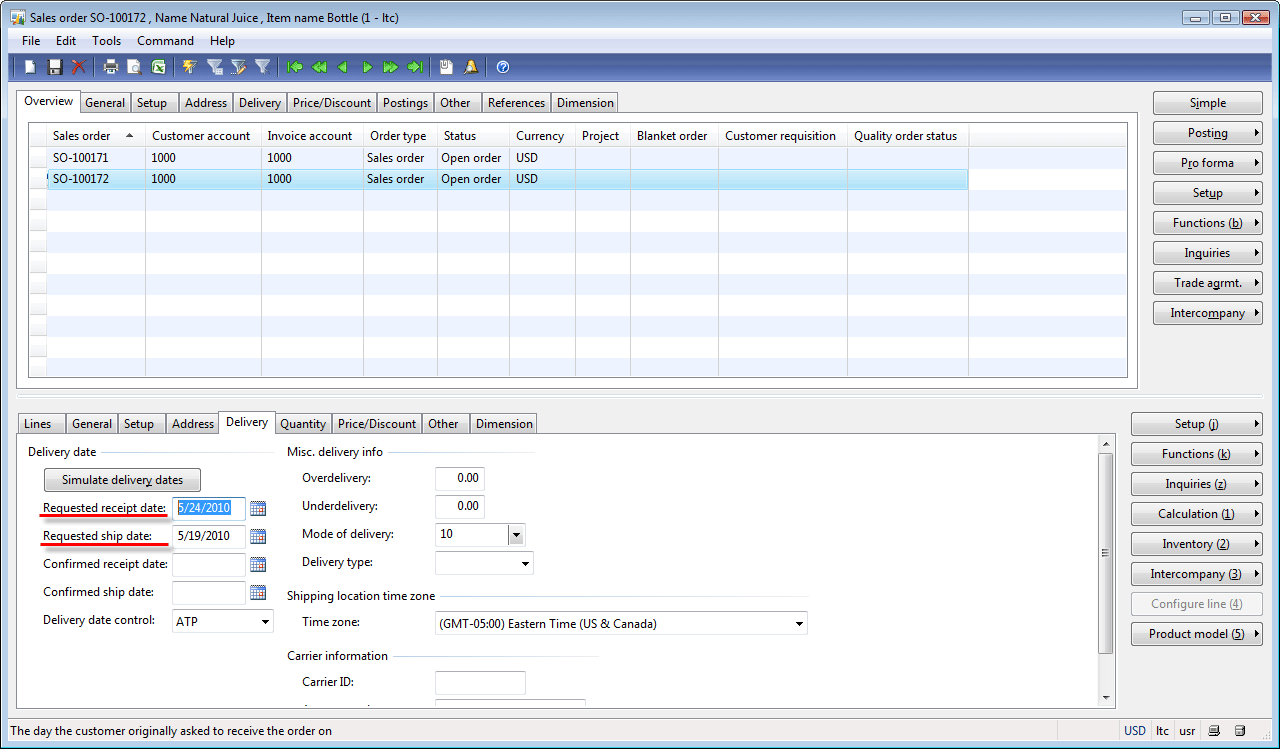
All these parameters are taken into account by the system. The only thing that the Sales Manager must do is to enter a sales order line, click the Simulate delivery dates button, select the first available date, click the Transfer to requested button, and then tell the available date to the Customer.
The Sales Manager performs all these steps and as a result, the Requested receipt date field contains 5/24/2010 the Requested ship date 5/19/2010.
The Sales Manager enters another sales line for 200 items Can Standard Black. And, also provides the Customer with the information about the receipt date. Create a sales line yourself.
In the next training lesson, we will study the shipment process.

Very comprehensive. The best AX tutorial ever. Good work V.
great tutorial covering the entire functional aspects of Supply chain cycle.looking ahead on sessions on the technical aspects of AX too, such as AOT, X++, etc. make it a one0stop guide for AX professionals.
Rajesh Koli
Hi,
Great tutorial – I use these a lot.
The only problem I have with Requested Receipt and Requested Ship dates is that AX updates these and therefore is not the true Requested date by the customer. We can never get accurate analysis of Requested vs Confirmed…..
Gary
In the purchase orde when we enter the items each item has a field called Serial number and quantity
So if I enter item called Laptop and quantity 100 and the serial number is required, so Is it logic to have a quantity with 100 laptops with only serial number or it is logically to have 100 serial number.
Please reply me as soon as possible
My best regards, and thanks for your efforts
M Sabri